pages

Showing posts with label craft. Show all posts

Tuesday, December 29, 2015

It's a Wrap 2015: A year in Review

WOW! what a year this has been. A roller coaster would be an understatement! So much has happened and so many new doors and paths were opened that my heads spins just thinking about it...
Here's a recap of what happened...


My favorite project
Definitely the Halloween Altered Spell Book. This two part project was so fun to make not only because I got to create in a vintage style I like but I also got to share with you a freebie and the responses were amazing! If you missed it here's Part 1 and Part 2

Highlight of the year
Opening my new website einatkessler.com was the highlight of my year. Finally there was one place for everything that is Einat Kessler. It took a long time until it was ready because I kept changing my mind about its design :) This website is the home for all my classes, printables, articles & tips and links to all my social media and Etsy shop. It is growing and evolving with each passing month and I have great things planned for the future.


Disappointment of the year
The road of a professional artist is paved with disappointments and things that don't work out. One of them was losing a business opportunity that wasn't even up to me. A company I was doing videos for decided to create a position within the company of someone who would do all their videos. But I always think that when one door closes somewhere a window is opened...

New Exciting Things
I can't pick only one...one thing is launching my monthly newsletter. I enjoy creating it each month and organizing deals for my subbies, sharing exclusive tips and techniques and basically creating a fun, vibrant and amazing community. The other thing is opening an Etsy shop which is a bigger success than I anticipated. My creations can find a good home and I can sell some of my excess supplies.

Challenge of the year
Starting my online classes wasn't easy. I had to get to a level of self belief that enabled me to offer knowledge for money. I had to believe that I had something valuable to share and that I was just as good. Apparently you all knew this before I did, because these classes are a huge success!

Future plans
Well...I guess you'll have to wait for 2016 to find out...but I can promise you there are plans and they are BIG!

Thanks you for all your love, support, warm comments, participation and taking part in this community. I wish you all a happy new year and may all your wishes for this year come true!

Don't miss out! Keep up with all the crafty goodness by subscribing to the Einat Kessler creative newsletter

Have fun creating! 

Friday, October 16, 2015

DIY Boo-tiful Halloween Frame

Everybody is so busy getting ready for Halloween, deciding what costumes to wear, what candies to buy and what decorations to have. The the big spooky day will be here and you'll take lots of photos why not display them in a spooktacular way too? You can make this BOOtiful frame ahead of time and display photos from previous Halloweens!


This frame is so easy to make you'll not believe it:

1. Attach metal wire to the back of plastic skulls with tape.

2. Attach wire to the back of frame with tape.

3. Cover frame with skulls duct tape.

4. Attach black cord to spiders. Let dry.

5. Attach cord to the back side of the top of the frame with tape so the spiders will hang from frame.

6. Cut the letter “B” from orange cardstock. Glue to bottom left corner of the frame. Add two bottle caps as O’s. The instructions for creating the spooky bottle caps are here.

You can find the full supply list and a step by step video tutorial here.

Don't miss out! Keep up with all the crafty goodness by subscribing to the Einat Kessler creative newsletter

Have fun creating! 


Saturday, September 27, 2014

Matchbox Vanity

I've always been fascinated by miniatures. The other day I stumbled upon a website of an artist who creates amazing miniature foods. It looks so real it's unbelievable. If you want to check it out here's the link. This has inspired me to create a miniature vanity, my style, meaning paper crafting and paper engineering vintage style.


I created the vanity from 10 matchboxes stacked up together in two stacks. I first inked all the edges and covered the front with patterned paper. I used The Station collection from MME.
Once all the matchboxes were glued together I covered all sides with chipboard so the vanity will be stronger and more real looking. I covered the chipboard with the same patterned papers.


For the embellishments on the top I used craft supplies that I converted into different things that are usually found on a vanity. The photo frames are bezels used to create pendants and jewelry. I cut off the ring of the pendant and turned it into a frame by adding a stand on the back. The mirror is also a bezel with an oval shape. The bottles were created from beads, a large bead for the bottle and a smaller one for the lid.


You should try to create a miniature, it's really fun and satisfying to create something from start to finish and make it look as real as possible. Make sure to watch the step by step video tutorial for all the details.

Follow me on Facebook and YouTube for more crafty treats!

Have fun Creating!
Einat

Tuesday, August 5, 2014

There Is No Place Like Home - House Projects

"Storms make trees take deeper roots" Dolly Parton

This quote speaks to me so loudly. In the last four weeks this is exactly how I feel. Those out there who fire rockets and want us destroyed just make me more determined! This is my home, it's the only place we have in the world. It's my family's and my friends' homes and we are here to stay.
While thinking and pondering about this I realized I made a lot of house theme projects during the years probably because this subject is important to me. I wanted to share these projects with you because I know this subject speaks to you too.


This is a layout I created with a photo of my mom and aunt when they were little girls. I created a background with bright colors as a childlike scene with flowers and a house. Happy, fun and nostalgic page.


My first video tutorial more then a year ago. Time flies when you're having fun! It's a mixed media, technique packed canvas with the house as a central focal point. If you want to revisit the video tutorial here's the link: http://youtu.be/HI0SEIGuLRI?list=PL2hIgklxaiuXMAdlaEk0ZYJEbp7RAgOuo


This a DT project I created for Susan Weckesser Inc. It's a house in a capsule of flowers and love. Note that the love breaks through the wall to the outside...


Another DT project, this time a frame cluster for family photos with a house in the center. This is a great piece for a wall in your home or as a gift.


This project was created as a workshop called House of Memories. It was a really fun workshop that produced different houses because each participant made a different roof and added different photos.


My favorite house projects are the two recycled houses from milk cartons. Both houses are photo displays for family photos. One a vintage flowery garden display and the other a spooky house for Halloween. You can find a step by step video tutorials for the Spooky House here:  http://youtu.be/E2g0qu02Pf8?list=PL2hIgklxaiuVG-o5vzJZHF8RmuPMgjPid


Finally a3D shadow frame with the famous quote: "Home is where the heart is". This project has layers of flowers as background and many 3D items and embellishments like a little high stool, shelf with books and a small garden bed with grass. There are even two quilled 3D pots with plants on the top of the frame.


To close this homey collection, a snowy card with a house in the snow for the holidays.

There are more house projects I created, many more then I realized when I started writing this post, but I think these are the top ones. Do you have any house projects? Try and create one, it'll warm your heart for sure!

Have fun creating!
Einat

Tuesday, July 22, 2014

10 reasons to create mini albums

Mini albums are one of the fun things to create in scrapbooking and paper crafts. I often get asked what's the point? what's so fun about mini albums? The answers to me are clear and I want to share them with you.


 1. Manageable Project
For some people, especially me, the thought of starting a big 12X12 scrapbook is just too overwhelming. When I know there is a beginning and an end to a project it looks much more doable.


2. So Much To Do So Little Time
Some people may not be overwhelmed by a large scrapbook they just don't have enough time. A mini album can be completed in one or two sittings. It can be done in a crop night, a class or with some friends.


3. Tackle a Subject
A mini album is usually about one person, place or occasion. That gives me much more freedom and choice with my photos. For example: if we go on a family vacation or even a day at the beach how many pages can be devoted to it in the big family scrapbook? not many, right? you need to choose only a few photos. However, in a mini album you can use many more photos and capture the experience much better.


4. Design Continuity and Freedom
It's much easier to create in designing terms. You can use matching papers and embellishments and create a design "language" to coincide your theme. Another advantage is you can go wild with shapes and page sizes as well as page materials.


5. Photo Organization
It makes life easier (at least in terms of photo organization) if you organize photos according to the mini album you are planning. Actually it makes it easier even in the stage of taking the photos because each event or theme can be divided into little sub stories. For example: First day of vacation, second day...etc. If you take the photos with that in mind and later organize them like that on the computer they'll be easy to find, go through and pick.


6. Number of Photos
many times you either have too many photos and are left with extras or too little photos for a large scrapbook. A mini album is the answer for both situations.

7. Cost
In the state of the current economy buying lots of supplies for a large scrapbook can be too expensive. However when you create a mini album you can create a beautiful project for less money, because working with small pages allows you to use scraps of paper, ribbons and embellishments.


8. Storage
Small in size, mini albums are more portable and easily stored. No need for huge bookcases that will hold 12" tall albums. You can also take them with you to show off your photos and creative skills!


9. Creativity
Designing smaller pages, you don't need to worry about having enough creativity flowing to cover numerous 12x12 pages. You can also use the mini album to try new techniques and materials in a smaller scale before doing them on a full scale.


10. Gifts
Because they are fast to make mini albums can be great gifts for family members, friends, co-workers, teachers and the list goes on. You can create the mini album with photos or design empty pages living spaces for the photos to be added later.

Did I convince you? With so many advantages I don't see how not!
Write a comment to this post sharing a link to your mini albums, so we can have more inspiration and fun!

Have fun creating!
Einat

Tuesday, July 15, 2014

Metal Charm - add shine to your creations

In today's crafting we use different materials and textures to create interesting striking projects. I think the more diversity in our projects the better they look and we have more fun creating them. One of my favorite ways to add magical shine, interesting texture and industrial look to my creations is using metal.

Metal can be found all around us and it's easy to come by. It comes in so many shapes and sizes and fits any project you want to create. By using different metal embellishments and incorporating them in different mediums you can create different looks to your projects.

Industrial/Steampunk

3D metal man created from metal gears and clock parts


Industrial canvas with lots of metal parts and embellishments


Using metal parts with an industrial look such as gears, clock parts, cogwheels etc. can produce a steampunk look to a project. Keep the metal parts in their original color or add industrial colors such as rust, copper, black and bronze. You can get parts like this in DIY stores, garages, industrial sites or buildings as well as online stores who specialize in metal embellishments and vintage parts.

Jewelry

Triple window with jewelry parts


Jewelry pieces have unique textures and shapes and are perfect for craft projects especially 3Dcanvases or altered art. They can be added in their original color and shape or they can be altered first by coloring them or priming them. I have a box full of jewelry parts that I got at flea markets, garage sales and even some old jewelry from my grandmother.

Textured embellishments

Frame with metal buttons


Layout with metal embellishments


Sometimes you don't want metal to be the focal point or the center of your project, but the shiny look of the metal can brighten up and add a different look to your creation. It can be small metal beads or a few metal rings to add a little bling or metallic feel to a project. You can also use metal buttons for extra shine and romantic feel in a project.

Have you tried using metal in your projects?

Follow me on Facebook and YouTube for more crafty treats!

Have fun creating!
Einat


Saturday, July 5, 2014

Forever House Calendar

One of the greatest puzzles of life is what influences a person more: environment or genes. In my case it's definitely both...my dad, who is an engineer, on one side and my love of crafting on the other, have both planted the love of building in me. every now and then I get the urge to build something. I'm talking about paper engineering, 3D crafting at its best. This time I built a House Calendar, which is basically a forever calendar for important dates that does not last only one year but forever.


How does that work? Each month has a little "room" in the house and in it a card or cards with important dates like mom's birthday or grandparents' anniversary, regardless of the day in the week or month.


My inspiration came to me from a chipboard window I had and decided to extend it. I build the outside frame and inner walls around it and according to its measurements. It might look a little difficult but building 3d structures from chipboard is actually easy if you measure accurately.


I used Bo Bunny patterned paper and some Prima flowers to cover and embellish my calendar house. I also finally used some old chipboard numbers I had, so this project was a de-stash adventure too. You can find all the details and measurements in the video.

Have you ever tried 3D building? Tell me about it!

Follow me on Facebook and YouTube for more crafty treats!

Have fun creating!
Einat

Saturday, June 14, 2014

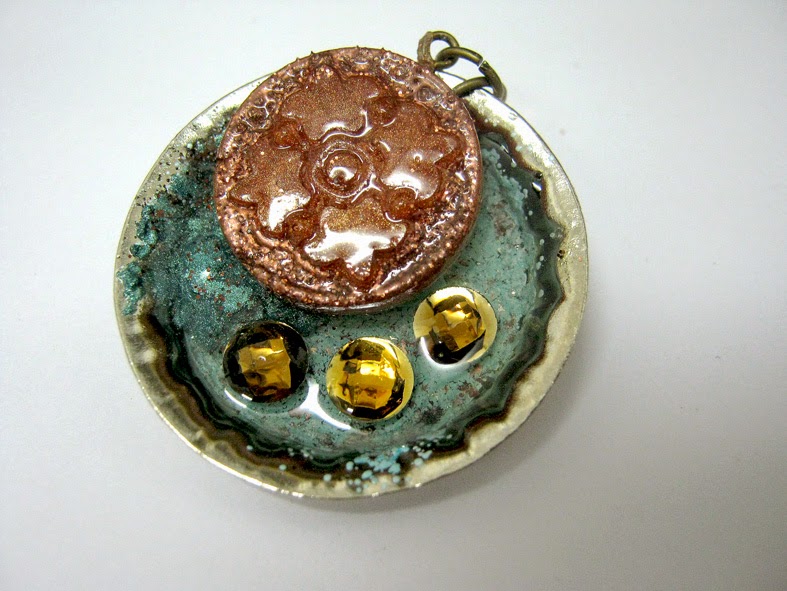
Ice Resin Pendants

I'm not a jewelry maker but every now and then I like to play with a little bit of jewelry making. It's actually kind of easy if you try it. My favorite material to play with is Ice Resin, which is  a 2-part epoxy resin. Part A is the Resin. It has a slightly blue tint and Part B is the hardener. It has a very slight yellow tint. It comes in a plunger that dispenses equal parts of both parts and is really to use.


It's really fun to play with and the only problem, at least for someone like me who likes immediate satisfaction, is that you have to wait a few hours before it's dry. I made three pendants and tried a few things and techniques.


First I tried different mediums to color the resin. Both Perfect Pearls powder and acrylic paint worked very well and blended completely with the resin. You can create different degrees of transparency depending on how much paint or powder you mix.


Then I had lots of fun working with Ice Enamels which is sort of an embossing powder that works great with the resin. The great thing was to create layers with  the enamel and adding embellishments.


Finally I did some Ice Resin Molding. I used Martha Stewart and Mod Podge acrylic molds and also came up with a great idea of how to turn the molds into beads or pendants. When the resin is cured it slides out of the mold and it's ready for use.

I assembled all the parts to beautiful shiny pendants and I'm really happy with how they turned out. Check out the video for all the details.
Do you create any jewelry? If not this was a fun way of starting!

You can also  Follow me on Facebook and YouTube for more crafty treats!

Have fun creating!
Einat

Tuesday, June 10, 2014

One Sheet of Paper: quick projects when time is short

Sometimes time is short and you need a quick project to make as gift, or you want to have fun with some crafty friends and you want to create something easy and fast. And every now and then you simply want to make something cheap but beautiful. Well...I have an idea, use only one sheet of paper to create a variety of pretty and fast projects!

Folded Mini Album


Create a beautiful mini album by folding a 12X12 cardstock in different directions. Add a few embellishments and photos. Find the full tutorial here.

One Paper - Three Cards

We all love celebrations, events and birthdays and us crafters always enjoy giving a special card for the event. But can we make cards and save our supplies at the same time? Yes we can...just use one sheet of paper to create three different cards.


By cutting a 12X12 double sided cardstock wisely you can increase your paper "real estate" and diversity. Follow the steps of the tutorial here.
 
Window Photo Display
 
Present photos in a cute and easy display made from one sheet of paper. This display has enough room for two photos and a special window for journaling. Find a step by step tutorial with photos here.
 
 
Flap mini album
 
Create a small but sturdy mini album that can fit in a purse or a bag. A few cuts and folds and a surprising binding are all the secrets you would need to know to create this project.
 
Use a double sided cardstock and a Bind-it-All to create the album's pages and the flaps. Check out the full photo tutorial here.
 
I hope you will find these ideas useful and create a few of them. I would love to see your creations. you can post them on my  Facebook page. Also check out my  YouTube channel for more crafty treats!
 
Have fun creating!
Einat