pages

Showing posts with label altered art. Show all posts

Sunday, January 17, 2016

Steampunk Hot-Air Balloon

The steampunk queen strikes again! FYI I didn't give myself this title...you did, or at least some of you Lol! I sure love steampunk and I'm happy to share with you another project. This one looks difficult but it's much easier than you think! It's because of all the tricks I'm using here to create faux metal and keep everything light weight.


I started with a plastic ball I got at the craft store, you can use an ornament or even a glass ball, although you will need to be a little bit more carefull with that. I covered the ball with pieces of gold Duck Tape and then painted it with black acrylic paint. I waited for about half a minute and then wiped the paint with a paper towel, creating a really pretty effect of blackened metal.

I added faux leather stripes with faux rivets and steampunk embellishments, including a propeller. I used an old cardboard box as the basket. I covered it with paper and embellished it a little. Remember you don't want the hot-air balloon to be too heavy so don't add a lot of metal pieces. Then I added four chains to the four corners of the basket and attached them to a wire ring I created to go around the balloon.


This was such a fun project. I love it so much I want to try to create an old zeppelin like they had in the 1940's. This might be slightly more difficult because it has an elliptic shape. I may use styrofoam shape or create it from newspapers and glue...I'll have to figure it out.

Since I've uploaded the video tutorial in advance and scheduled it (I'm at CHA, remember?)  I can't embed it here. So if you want to see the full video tutorial, it's on my YouTube channel.

Don't miss out! Keep up with all the crafty goodness by subscribing to the Einat Kessler creative newsletter

Have fun creating!

Sunday, January 10, 2016

Faux Wood Fairy House

I've been wanting to do this for awhile...build a fairy house that'll look like a real (as much as a fantasy can be real) forest fairytale hideaway. With a mossy roof and little door and windows. Finally I did it! This fairy house is part of my Designer Showcase presentation in the CHA Mega show 2016
(which I'm at right now!). It was so fun to make I thought I'd share it with you...


I started with an empty plastic flowerpot. To give it a faux wood effect you need to create all the ridges in the trunk. The way to do that is with a wet paper towel. Glue the paper towel on the flowerpot while sculpting it a little. After it's dry paint it with a few brown shades. I had only one brown paint so I added black and white to create more colors.


I created the roof from pieces of corrugated cardboard I painted first. I cut small triangles and squares and made them uneven. Then I created a little cone (like a witch's hat on Halloween) and covered it with the cardboard pieces. Before adding a little moss in between the gaps I sprayed the roof with some spray inks.


Finally I added the windows and door and the house was reay! I knew the house was good when my mom said she feels like playing with some dolls and the house Lol!

Since I've uploaded the video tutorial in advance and scheduled it (I'm at CHA, remember?)  I can't embed it here. So if you want to see the full video tutorial, it's on my YouTube channel.

Don't miss out! Keep up with all the crafty goodness by subscribing to the Einat Kessler creative newsletter

Have fun creating!

Sunday, December 20, 2015

Altered Tin Box Zettiology Style

A really fun project for you this week! An altered box, but not the common way you know of altering the outside with paint and embellishments. This alteration is only on the inside and in a very unique style of art called Zettiology, which was created by the artist Teesha Moore.


Zettiology is basically a style of art that mixes the real world with the fantasy world. It's all about creating fantastical images of creatures that have a human body with an animal head or vice versa. They all have large eyes, unlogical body features and parts that don't go together in the real world. And they all "live" in a fantasy, colorful world, a world that gives you a feeling that you are not on earth anymore.


Achieving this look is easy. All you need to do is mix and match different images, body parts and species. I took a girl's body and gave her an owl face and wings. Obviously there is no such creature except in my imagination :) I created a very bold and colorful background with alcohol inks and also added a title and doodling. To finish the scene I added a stars vine as a "tree".


How do you feel about this type of art? Do you like it, hate it? Does it freak you out or inspire you? Share with us in the comments.

Don't miss out! Keep up with all the crafty goodness by subscribing to the Einat Kessler creative newsletter

Have fun creating!

Sunday, October 11, 2015

Altered Halloween Spell Book

I think the most fun projects I ever made were made for Halloween. I love all the creepy spooky stuff you get to add to everything and even if I don't celebrate this holiday it's still fun. This altered spell book takes a little time to create but I think the result is worth the wait.


You start with an old book and a plastic skull. If you have a spider or some other Halloween embellishment you can use that instead. The next step is to create texture on the front cover of the book by adding the skull and a spider web with a hot glue gun. Don't worry if the lines are not straight or you get glue hair, the more texture the better.


When the glue is dry cover it with a damp paper towel and Mod Podge. Once that's dry (remember I told you it takes time? Be patient) paint everything with black acrylic paint. It doesn't look much but when the paint dries make the lines of the web pop out with Inka gold. I also added a little brown acrylic paint to add another layer of color.


The final step is to glue the two front and back pages to the inside of the cover and age everything with distress ink. Next time we'll work on the inside of the book...Can't wait!

Don't miss out! Keep up with all the crafty goodness by subscribing to the Einat Kessler creative newsletter

Have fun creating! 

Sunday, May 31, 2015

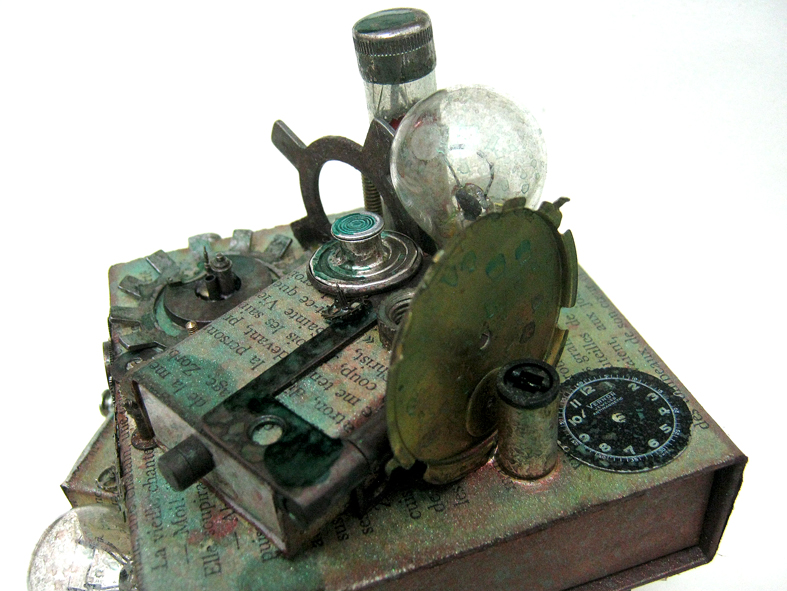
Steampunk Altered Boxes Chest

You asked for altered art videos And you asked for steampunk projects videos so what's better than combining the two? This was such a great project to make. I know I say that about all the projects I make but I really enjoy creating steampunk projects! Pure FUN!!


This project almost didn't happen. I was thinking what to do for this week's Saturday MIXTRAVAGANZA video tutorial and my mind went blank. I couldn't think of what to do, nothing came into my mind. I remembered you guys asked for altered stuff projects so I went to my studio and started going over stuff I have in my drawers. Nothing...my mind was empty! Whenever you have a situation like that the best thing is to stop thinking about it. Just leave it. The minute I let go it came...I'll do a steampunk altered boxes and I'll pile them one on top of the other and create a funky chest.


As all my projects go...that's about all I had. Didn't know hoe to do it, with what to cover the boxes what embellishments to use. But when I started working the magic happened, my mind was filled with ideas and they kept on coming. I never plan ahead. sometimes it's nerve wrecking, because I have to film a tutorial and I have no clue what I'm going to do. But there's a lesson to be learned here...trust yourself, trust your talent, your intuition and experience and everything will be ok!


I had so much fun...you guys know how much I love steampunk! I know I still need to work on the Creating 101: Steampunk class and I promise it will be ready soon! In the meantime you can enjoy this tutorial.

Don't miss out! Keep up with all the crafty goodness by subscribing to the Einat Kessler creative newsletter

Have fun creating!

Saturday, April 18, 2015

No Sew Fabric Mini Album

I love creating mini albums but not always use paper. I try to challenge myself to try new materials and see what kind of mini albums they would make. Today I played with fabric. And the best thing is that this mini album doesn't need any sewing at all. So if you don't have a sewing machine or don't know how to sew you can still create this mini album! All you need is some ink, acrylic paint and stamping objects to create this fun project! I'm sure there are some fabric pieces in your stash you can play with...right?


For this mini album you can use any type of cotton fabric or cheesecloth. It needs to be flexible and thin enough to be folded and its texture needs to be the kind you can paint on because it will be covered with gesso to prime it. felt, for example will not work here. This is basically the same process as creating a canvas for the wall only without the frame. We will prime the fabric with the gesso so it will seal the fabric and prevent any absorption of the mediums we will be adding.


Once all the fabric pages have been primed and thoroughly dried we can start adding the patterns, words and colors to the pages. I used Ann Butler's pigment ink by Clearsnap that is suitable for fabric and is permanent after a heat set with a heat tool or an iron. The color scheme I chose was teal, purple and black. I also used black acrylic paint. As usual, I didn't have a plan, so I started adding colors and shapes. The important thing in creating this type of project is layering. Layer colors, words and shapes to create an interesting page with a message. I didn't add photos but it is definitely something you can add. Just make sure everything is completely dry so the photos will not be stained or wet.


To create the different patterns on the page I used Ann Butler's 2" Faux Quilting Acrylic Stamps and found objects like TP roll and an old credit card. You can use whatever objects you have to create stamps in any shape or size. I also used the really cool martha Stewart brushes to add all kinds of lines. Make sure to dry each page before turning it over to work on the other side.


Here are some of the supplies you'll need for this project. Some of these are affiliate links which means if you click the link and make a purchase, I get paid a few coins. This helps me keep on blogging and sharing different projects with you. Thanks in advance for your support, dear friends!

White Canvas Fabric
Fabric Ink
Martha Stewart Brushes
White Gesso
Letter Stamps

Fabric Tac


For all the tips, tricks and a full process check out the video.

Don't miss out! Keep up with all the crafty goodness by subscribing to the Einat Kessler creative newsletter


Have fun creating!

Sunday, March 15, 2015

Altered Steampunk Wood Frame

One of the things I decide to do this year is use things in my stash, upcycle and alter. I have too many things cluttering up my little studio and finding new ways to use things that I have is not only challenging my creative mind, which is a good thing, but also declutters my room.


For this steampunk frame I used an old wood frame that I started about 6 years ago, yes...I had it for 6 years! Altering a wooden frame is easy - all you need to do is prime it and then embellish! I gave it a steampunk look with all kinds of embellishments that I have in my stash.


The idea behind steampunk is a combination of industrial and victorian. That means you need to combine industrial looking things like cogwheels, pipe parts and hinges with more soft romantic things like flowers, buttons and keys. Some of the things I used are: cogwheels, clock parts, washers, pipe parts, hinges, bottle caps, zippers, spring, metal flowers and buttons, key and all kind of metal embellishments and trinkets.


Use a strong adhesive to attach everything to the frame and then decide if you want to cover it or leave it untouched. I covered it with acrylic paint and spray inks. You can also cover it with gesso and just spray.


Watch the step by step video tutorial to find out how the entire process works and get some tips on where to get all those findings and embellishments.

Follow me on Facebook and YouTube for more crafty treats!

Have fun creating!
Einat

Tuesday, December 16, 2014

Hanukkah Altered CD Mini Album

Every year I create a Hanukkah mini album for the holiday photos and every year it stays empty. however this year i made a promise to myself to add all the photos!
The mini album is created from CD's in red and yellow colors which are two important elements that need explaining.


Many Jewish holidays revolve around eating specific, traditional foods: matzah for Passover, hamentaschen for Purim and challah bread for Shabbat. On Hanukkah, Jews celebrate the miracle of the oil in the Temple that miraculously lasted eight days when it was only enough for one.
Accordingly, Hanukkah celebrations revolve around the miracle of oil and the menu features fried foods (not very healthy I know). Crispy fried potato pancakes take center stage at the beginning of a Hanukkah dinner, and in Israel and elsewhere, jelly donuts, called sufganiyot, are the most popular Hanukkah food.


Both foods have round shape like a CD which makes it perfect for a Hanukkah mini album!


In regards to the colors...traditionally in the US the colors of the holiday are white and blue, and sometimes silver. The explanation for that are probably the colors of the Israeli flag. However, I think that yellows and reds which are the colors of light and fire are a perfect fit too. After all this is the festival of Lights in which eight candles are lit.


The album design is very basic. All pages are covered with patterned papers. Each page is embellished with candles according to the days of the holiday from one to eight. The candles are created from rolled scraps of paper and a flame I cut from paper and adhered to the rolled paper.
All pages are interactive to allow room for more photos and include decorated tags for journaling.


Follow me on Facebook and YouTube for more crafty treats!
Happy Holidays!

Have fun creating!
Einat