pages

Showing posts with label Halloween. Show all posts

Tuesday, October 27, 2015

5 Minutes Craft - Mummy TP Trick or Treat Boxes

There's just enough time to make these spook-tacular easy and fun toilet paper rolls mini Trick or Treat boxes and fill them with yummy candies. All you need are a few TP rolls that instead of finding their way to the bin can be used to create last minute party favors.


This is a great craft to do with your kids or in school. It only takes 5 minutes to create the box, wrap it with a white bandage you can get at the pharmacy and add a face. The face is the really fun part because you can create all kinds of spooky faces with as many eyes or teeth that you want!


Don't miss out! Keep up with all the crafty goodness by subscribing to the Einat Kessler creative newsletter

Have fun creating! 

Friday, October 16, 2015

DIY Boo-tiful Halloween Frame

Everybody is so busy getting ready for Halloween, deciding what costumes to wear, what candies to buy and what decorations to have. The the big spooky day will be here and you'll take lots of photos why not display them in a spooktacular way too? You can make this BOOtiful frame ahead of time and display photos from previous Halloweens!


This frame is so easy to make you'll not believe it:

1. Attach metal wire to the back of plastic skulls with tape.

2. Attach wire to the back of frame with tape.

3. Cover frame with skulls duct tape.

4. Attach black cord to spiders. Let dry.

5. Attach cord to the back side of the top of the frame with tape so the spiders will hang from frame.

6. Cut the letter “B” from orange cardstock. Glue to bottom left corner of the frame. Add two bottle caps as O’s. The instructions for creating the spooky bottle caps are here.

You can find the full supply list and a step by step video tutorial here.

Don't miss out! Keep up with all the crafty goodness by subscribing to the Einat Kessler creative newsletter

Have fun creating! 


Sunday, October 11, 2015

Altered Halloween Spell Book

I think the most fun projects I ever made were made for Halloween. I love all the creepy spooky stuff you get to add to everything and even if I don't celebrate this holiday it's still fun. This altered spell book takes a little time to create but I think the result is worth the wait.


You start with an old book and a plastic skull. If you have a spider or some other Halloween embellishment you can use that instead. The next step is to create texture on the front cover of the book by adding the skull and a spider web with a hot glue gun. Don't worry if the lines are not straight or you get glue hair, the more texture the better.


When the glue is dry cover it with a damp paper towel and Mod Podge. Once that's dry (remember I told you it takes time? Be patient) paint everything with black acrylic paint. It doesn't look much but when the paint dries make the lines of the web pop out with Inka gold. I also added a little brown acrylic paint to add another layer of color.


The final step is to glue the two front and back pages to the inside of the cover and age everything with distress ink. Next time we'll work on the inside of the book...Can't wait!

Don't miss out! Keep up with all the crafty goodness by subscribing to the Einat Kessler creative newsletter

Have fun creating! 

Friday, October 2, 2015

Halloween Spooky Bottle Caps

Are you ready for Halloween?
I think it's one of the most fun days of the year (even though I don't celebrate it myself). All the spooky costumes, the decorations and the candy...well what's not to like right?


Here's a little fun and fast project I created using bottle caps and paper to get you in the mood, if you haven't started already... It's a great project for kids on a cold afternoon.

Here's how you can make yours:

1. Punch 1” circles from cardstock.
2. Create monster faces with combination of different size eyes. Draw different shaped mouths with black pen.
3. Create hair from metal wire: Cut pieces from metal wire and glue to the back of the bottle cap with tape. Cover it with a 1” circle. Shape the metal wire to create curls, straight or crazy shapes.
4. Use the bottle caps as party favors, napkin holders, decoration or embellishments for scrapbook layouts and cards.

The full supply list can be found here

Don't miss out! Keep up with all the crafty goodness by subscribing to the Einat Kessler creative newsletter

Have fun creating!

Tuesday, August 5, 2014

There Is No Place Like Home - House Projects

"Storms make trees take deeper roots" Dolly Parton

This quote speaks to me so loudly. In the last four weeks this is exactly how I feel. Those out there who fire rockets and want us destroyed just make me more determined! This is my home, it's the only place we have in the world. It's my family's and my friends' homes and we are here to stay.
While thinking and pondering about this I realized I made a lot of house theme projects during the years probably because this subject is important to me. I wanted to share these projects with you because I know this subject speaks to you too.


This is a layout I created with a photo of my mom and aunt when they were little girls. I created a background with bright colors as a childlike scene with flowers and a house. Happy, fun and nostalgic page.


My first video tutorial more then a year ago. Time flies when you're having fun! It's a mixed media, technique packed canvas with the house as a central focal point. If you want to revisit the video tutorial here's the link: http://youtu.be/HI0SEIGuLRI?list=PL2hIgklxaiuXMAdlaEk0ZYJEbp7RAgOuo


This a DT project I created for Susan Weckesser Inc. It's a house in a capsule of flowers and love. Note that the love breaks through the wall to the outside...


Another DT project, this time a frame cluster for family photos with a house in the center. This is a great piece for a wall in your home or as a gift.


This project was created as a workshop called House of Memories. It was a really fun workshop that produced different houses because each participant made a different roof and added different photos.


My favorite house projects are the two recycled houses from milk cartons. Both houses are photo displays for family photos. One a vintage flowery garden display and the other a spooky house for Halloween. You can find a step by step video tutorials for the Spooky House here:  http://youtu.be/E2g0qu02Pf8?list=PL2hIgklxaiuVG-o5vzJZHF8RmuPMgjPid


Finally a3D shadow frame with the famous quote: "Home is where the heart is". This project has layers of flowers as background and many 3D items and embellishments like a little high stool, shelf with books and a small garden bed with grass. There are even two quilled 3D pots with plants on the top of the frame.


To close this homey collection, a snowy card with a house in the snow for the holidays.

There are more house projects I created, many more then I realized when I started writing this post, but I think these are the top ones. Do you have any house projects? Try and create one, it'll warm your heart for sure!

Have fun creating!
Einat

Saturday, October 12, 2013

Spooky Halloween House

Altered art is fun and useful. instead of throwing away our packages and boxes we can turn them into something nice. This is exactly what I did with this milk carton....it was transformed into a spooky house that can be used as a photo display or a centerpiece for Halloween.


As you can see in the video a coat of paint and a some embellishment can change even a milk or a juice carton and take it to another level. If you don't have Halloween embellishments you can create some like I did.


Have fun creating!
Einat

Friday, November 23, 2012

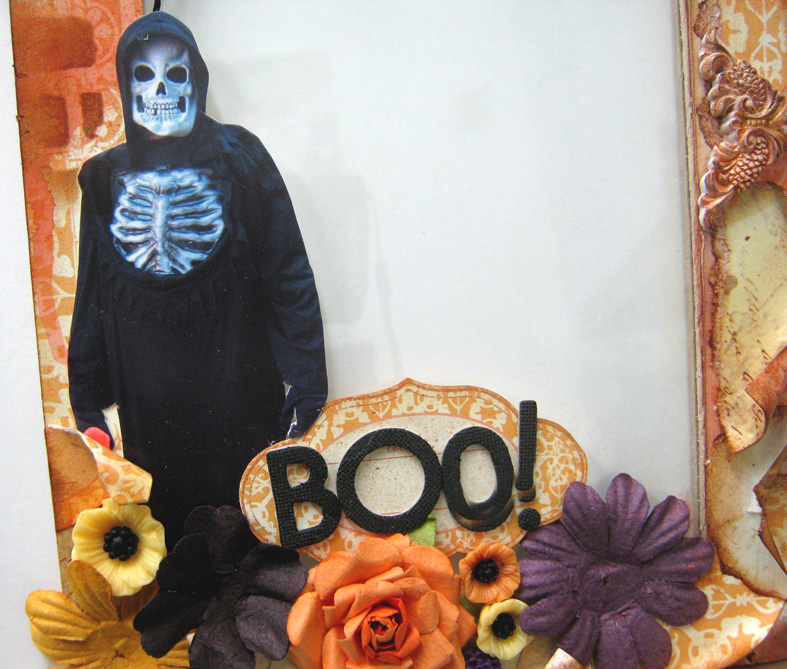
BOO! frame

It's always an honor to be featured in Prima's blog, but this month it was something special...it happened twice! Here's another project of mine that was on the blog, the Boo! frame.

This is a frame I created with a photo of my son's costume which was not only scary and great but was one of my favorite costumes over the years. Had to honor it with a special project...
I started by covering the wooden frame with torn inked paper.I added a little mist and paint to it to enhance the colors and the background. I cut my son's image from the photo and added it to the frame as my focal point.

I created a spider's web from black twine by cutting pieces of twine and adhering them in a web shape. I also added a chandelier and flowers.
 
Now I just need to add the photo to the frame!
 
Have fun creating!
Einat

Monday, October 31, 2011

Halloween Freebies X2!

Happy Halloween everyone!

I hope you are ready and have amazing scary costumes. Make sure you have big baskets or bags and get ready for the great sugar rush!

Here are… not one, but two freebies for your Halloween layouts: A paper and a set of stamps! Use the background to create spooky layout with your photos and embellish it with the "scary" monsters.
You can Download the paper here


You can download the stamps (png file) directly by clicking on your right mouse button and saving it on your computer.


Here is my scary LO. I've used the background, three of the stamps and part of the this stamp:


Have fun trick or treating!

Einat

Monday, October 24, 2011

Halloween Freebie!

You want it, you got it!

I want to thank all of you for all the support, warm words and compliments you have showered upon me after posting the first freebie stamp last week. You wanted another one well…here it is!


Isn't it a "scary" and funny Halloween stamp? I enjoyed making it and I hope you'll enjoy using it. Here is a digital Lo with the stamp. Thanks Emily Giovanni for the paper and frames.


Have fun creating!

Einat