pages

Showing posts with label Reuse. Show all posts

Sunday, November 1, 2015

Ready, Get set, DESTASH! Art Journal Page: Funnel

If you don't have leftover letter stickers raise your hands! No one?! we all have them. I have sheets of letter stickers from years ago just taking up space. I can't spell any words because I'm only left with Z, X and maybe a D or two and it really annoys me. So I challenged myself to come up with using some of them!


I used them as masks! Stuck them randomly on an art journal spread in a funnel shape, covered them with some gesso and Gelatos and created an amazing background. Then I added some more letters and sentences with a black pen. I wrote my journaling on the bottom of the page in an upside funnel shape.


This art journal page is a representation of what's going on in my brain. This is how I feel when everything is turning up there and concentrates to one amazing creative idea! It's a funny process that works like a funnel leading all my ideas, thoughts, fears and imagination into one point of inspiration. It's a weird process...but it is what it is :)


How do your ideas pop into your head? Try telling this story in a visual way...it's fun!

Don't miss out! Keep up with all the crafty goodness by subscribing to the Einat Kessler creative newsletter

Have fun creating! 

Sunday, September 13, 2015

Toys Shadow Box Wall Hanging

I did some new year's cleaning in my boy's' room and found some old toys they didn't want anymore. I gave most of them but I kept a few small ones that I likes to create a toys' shadow box to hang on the wall. It reminds me of the old days when they were little kids playing on the carpet and making noise.


I used some old jewelry boxes as the base of the shadow box collection and covered them all with paper on the outside and inside. I tried to match the paper to the toys as well as adding the same themed embellishments.


You can use all kinds of boxes to create this collage and different size or theme toys. For a girl some ballerinas, butterflies or small dolls would be great! It's a really nice childhood memorabilia to display at your home.


Don't miss out! Keep up with all the crafty goodness by subscribing to the Einat Kessler creative newsletter

Have fun creating!

Sunday, March 15, 2015

Altered Steampunk Wood Frame

One of the things I decide to do this year is use things in my stash, upcycle and alter. I have too many things cluttering up my little studio and finding new ways to use things that I have is not only challenging my creative mind, which is a good thing, but also declutters my room.


For this steampunk frame I used an old wood frame that I started about 6 years ago, yes...I had it for 6 years! Altering a wooden frame is easy - all you need to do is prime it and then embellish! I gave it a steampunk look with all kinds of embellishments that I have in my stash.


The idea behind steampunk is a combination of industrial and victorian. That means you need to combine industrial looking things like cogwheels, pipe parts and hinges with more soft romantic things like flowers, buttons and keys. Some of the things I used are: cogwheels, clock parts, washers, pipe parts, hinges, bottle caps, zippers, spring, metal flowers and buttons, key and all kind of metal embellishments and trinkets.


Use a strong adhesive to attach everything to the frame and then decide if you want to cover it or leave it untouched. I covered it with acrylic paint and spray inks. You can also cover it with gesso and just spray.


Watch the step by step video tutorial to find out how the entire process works and get some tips on where to get all those findings and embellishments.

Follow me on Facebook and YouTube for more crafty treats!

Have fun creating!
Einat

Tuesday, December 16, 2014

Hanukkah Altered CD Mini Album

Every year I create a Hanukkah mini album for the holiday photos and every year it stays empty. however this year i made a promise to myself to add all the photos!
The mini album is created from CD's in red and yellow colors which are two important elements that need explaining.


Many Jewish holidays revolve around eating specific, traditional foods: matzah for Passover, hamentaschen for Purim and challah bread for Shabbat. On Hanukkah, Jews celebrate the miracle of the oil in the Temple that miraculously lasted eight days when it was only enough for one.
Accordingly, Hanukkah celebrations revolve around the miracle of oil and the menu features fried foods (not very healthy I know). Crispy fried potato pancakes take center stage at the beginning of a Hanukkah dinner, and in Israel and elsewhere, jelly donuts, called sufganiyot, are the most popular Hanukkah food.


Both foods have round shape like a CD which makes it perfect for a Hanukkah mini album!


In regards to the colors...traditionally in the US the colors of the holiday are white and blue, and sometimes silver. The explanation for that are probably the colors of the Israeli flag. However, I think that yellows and reds which are the colors of light and fire are a perfect fit too. After all this is the festival of Lights in which eight candles are lit.


The album design is very basic. All pages are covered with patterned papers. Each page is embellished with candles according to the days of the holiday from one to eight. The candles are created from rolled scraps of paper and a flame I cut from paper and adhered to the rolled paper.
All pages are interactive to allow room for more photos and include decorated tags for journaling.


Follow me on Facebook and YouTube for more crafty treats!
Happy Holidays!

Have fun creating!
Einat

Sunday, December 7, 2014

Steampunk Desk Organizer

Don't throw away empty food packages or tp rolls...use them to create something new and useful! I used mine to create a steampunk desk organizer for some new brushes, aquarelle pencils and other supplies.


I started with covering all the boxes and tp rolls with paper. I used several patterns that have a steampunk vintage look. The best way to cover something with paper is to use Mod Podge. Just use a brush to apply it. after everything was completely dry I painted the inside with black acrylic and added a nice washi tape border.


I assembled all the parts gluing them together to create the desk organizer. Then it was time to embellish! I added steampunk theme metal embellishments like gears, screws, cogwheels and more. I also added other embellishments that looked good with the general theme. I inked the exposed areas with brown and black inks for that industrial feel.


Now all I need to do is buy all that supply I need and put it in its new home!
Check out the video for a step by step tutorial and tips.
Follow me on Facebook and YouTube for more crafty treats!


Have fun creating!
Einat

Saturday, August 30, 2014

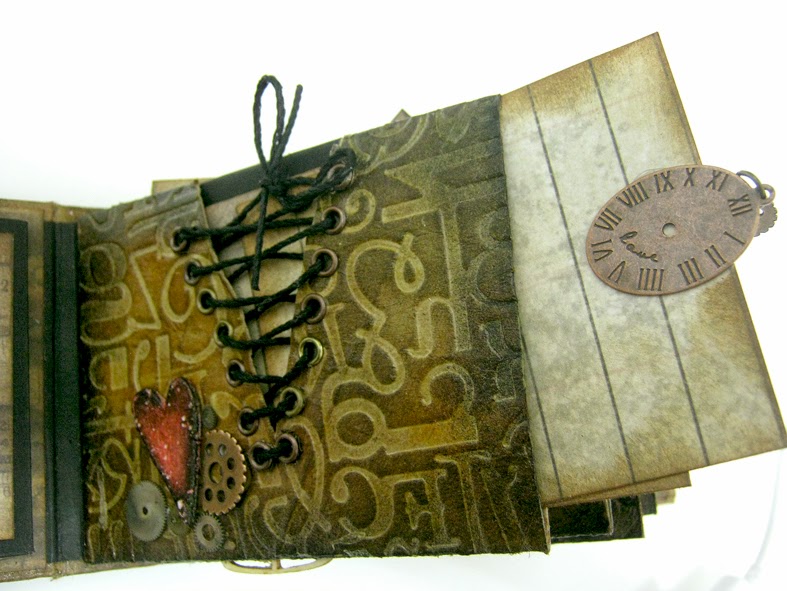
Faux Leather TP mini Album - THE PAGES!

WOW!! I got so many amazing responses. Thank you! I'm so happy you liked this mini album as much as I did. Wasn't it really fun and easy to make? Well...after much anticipation here comes the second part...THE PAGES! We'll venture into these beautiful pages and learn how to create them one by one!

Let's get started!


This album is full of interactive surprises. Pockets, flaps and more... as well as handmade embellishments that will take your breath away. Some of the work is delicate and requires patience but believe me, it's worth it!


Since TP rolls are already pockets, that part is rather easy. All you need for this part is to add tags. I used scraps of paper from Tim Holtz papers to create the tags. To embellish the tags I add a cogwheel or sticker to each one.


The most challenging pages were the corset opening page and the butterfly embellishment page. They took a long time to plan, but you're lucky I've done all that for you already. They do need patience to create but I think you'll agree it's worth the time.


In general the entire mini album took longer to make then I originally thought partly because I tend to try almost every possibility when I design until I'm happy. So I need to work on that... I've managed to edit the video so it will be much shorter but still simple and easy to understand.
Make sure to watch the video tutorial for all those important steps to create all the pages!


I will be happy to see how your mini albums turn out. If you make one please share!

Follow me on Facebook and YouTube for more crafty treats!

Have fun Creating!
Einat

Saturday, August 16, 2014

Mixed Media Altered Paintbrush

I've been wanting to alter a paintbrush for awhile but I just never found the right one. All the paintbrushes I could find always seemed to be too small. I wanted a big paintbrush so I can treat it like a canvas and so a mixed media creation on it. Well... I finally found one, or my husband did. A 6" paintbrush with a wooden handle (much easier to paint than plastic)...what a joy!


I wanted to create a colorful, happy scene with lots of flowers and give it a homey feeling by adding a white picket fence and a street light.


I started with covering the paintbrush with gesso and then stenciled the entire surface of the paintbrush including the bristles. Then I colored it with spray paints creating a multi colors textured background. I added the fence and the street light and embellished with layers of many bright colored flowers. I also added more textured with cheesecloth and lace I colored with the same sprays.


Altered projects are so much fun and it just goes to show you never throw anything away because you never know what your creative mind will come up with!
Do you have any fun ideas to reuse old unwanted things?

Make sure to check out the video tutorial for all the details, tips and techniques!

Follow me on Facebook and YouTube for more crafty treats!

Have fun creating!
Einat