pages

Showing posts with label canvas. Show all posts

Sunday, January 3, 2016

Mixed Media Canvas: Wall of Inspiration OPEN

It has been a while since I created a canvas for my wall of inspiration. In case you missed it the wall of inspiration is a wall in my craft studio that I'm filling with little canvases of inspiration. Each canvas has a word or a quote to encourage, uplift and remind me that life is beautiful! Today's word is OPEN...open your mind, your eyes, your ears, open your heart. Open the door to the beauty of the world, to its possibilities and wonder!


I created the background with tissue paper and Gelatos. I kept the colors bright and happy. Then I created the letters. I used a blank white paper and added the same colors as the background. Then I cut the four letters and added zentangle patterns on them. I didn't plan the patterns ahead I just played with my pen and I was happy with whatever came out of it. The idea about this type of doodling is not to think too much...just doodle!


I glued the letters to the canvas and shaded them a little with Artist's Big Brush Pens. I also colored inside the letters, but just a little to add vibrant colors to compliment the background colors on the paper and the canvas.


Have you ever doodled? Are you planning to try? Please leave a comment telling me about it!

Don't miss out! Keep up with all the crafty goodness by subscribing to the Einat Kessler creative newsletter

Have fun creating!

Sunday, November 8, 2015

Steampunk Christmas Tree Canvas

Creating steampunk images are a lot of fun. It's basically an easy idea where you create an image from metal embellishments, clock faces and cogwheels. It can be any image like a person or an abstract image. I think it's time to start thinking about Christmas so I created a steampunk Christmas tree.


I used a 8x8 canvas and created the background from old book pages. I inked all the edges with brown and black distress inks. When it was dry I used large metal pieces to create the base of the tree and added smaller pieces as ornaments. I also added metal squares with twine as gifts. I stamped Merry Christmas and added little metal beads as stars.


You can create the same tree with other style of embellishments if you don't want it to be in a steampunk style. The style and color of the embellishments you use will determine the mood of the canvas. For example if you use blue and white paper and embellishments you will have a snowy canvas and if you use old Christmas embellishments or photos you will have a vintage scene.


This can be a great gift or a decoration on your wall. Any way you'll create it this canvas will get you and everyone into the season spirit!


You can subscribe to the  Einat Kessler creative newsletter and make sure you don't miss anything!

Have fun creating!

Sunday, June 28, 2015

Wall of Inspiration: Mixed Media Canvas - Grow

Experimenting is one of the best things in mixed media. It's fun to try new materials, new techniques and new combinations. in this new small canvaS for my wall of inspiration I tries a new technique with hot  glue. Yes...that hot glue that you use for gluing things down. Apparently it can be a really great material to add texture to a canvas or an art journal page.


I used some aquarelle pencils and gelatos to add layers of color to my canvas. I added lots of texture with modeling paste and the hot glue art I created. I used a low temp hot glue gun which was much easier on my fingers. I don't know why but I always manage to get my fingers burned when I'm using a hot glue gun, so this one was great.


This is a great technique to try on an art journal page too, but remember to gesso your page first. And make sure everything is dry before you close your journal. Hot glue tend to be sticky sometimes, especially after using a heat tool around it.


What materials and techniques did you experiment with? Check out the video to find out how my experiments turned out!

Have fun creating!

Sunday, May 24, 2015

Mixed media canvas - Fill Your Life

Sometimes it's really fun taking things literally. Especially art. Usually art is something expressive that you can take to different directions and interpret how you want. But this mixed media canvas means exactly what it says...


I started thinking one day about all the good things my life is filled with and how I never want them to end. Then i thought this could be a great subject for a "Wall of Inspiration" canvas. "If only I could actually fill something with these things..." But wait...I can!


I remembered all these little bottles I have kept around (because I never throw anything away...) and knew they will be just the right thing for this canvas. You can use old perfume bottles and test tubes and you can also get them in craft stores. From that point everything was really quick and easy and doing the video was pure fun!


Check out all the texture I created on the canvas with layers of old book pages, gesso and a bandage (yes that same kind you buy in the drug store). Then I simply added my bottles and the signature word for the canvas. as you remember every "Wall of Inspiration" has a word or a phrase.
I loved how it turned out...What do you like to fill your life with?
Don't miss out! Keep up with all the crafty goodness by subscribing to the Einat Kessler creative newsletter

Have fun creating!

Tuesday, February 24, 2015

Wall of Inspiration with Ann Butler inks

I'm a huge believer in the phrase: “Inspiration exists, but it has to find you working” by Pablo Picasso. I feel it almost everyday. I get my best ideas when I'm working, because creating gets the process rolling and sets the mind to follow.


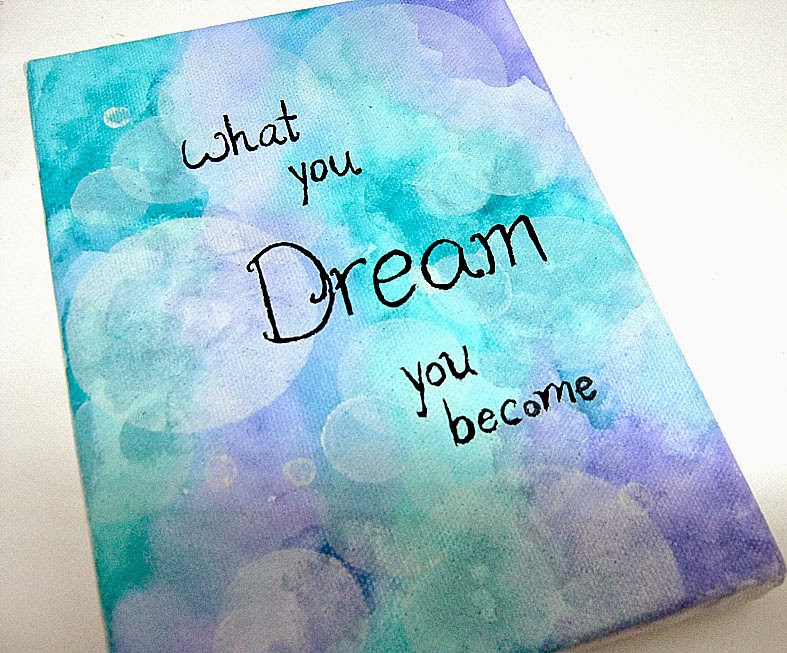
So...I decided to create a wall of inspiration. It'll be a collection of small canvases with phrases and words on different mixed media techniques that I will hang on the wall in front of me and every time I'll look up I'll see this burst of inspiration and creativity!


The first canvas in the collection id DREAM. I created a very muted background with a bokeh effect. I started with converting Ann Butler's Crafter's Ink to water colors with a water pen and layering. I build a colorful background with purple and teal colors in a cloudy dreamy look.


Then I punched a few circles and used the negative cardstock pieces as stencils and created different sizes of  circles with white ink and a finger dauber. I layered the circles and spread them around the canvas. When the background was finished I added the sentence with a pen nib and black ink.

What gives you inspiration to create?

Check out the step by step video tutorial for all the details and tips on how to create this canvas with all the water colors effects.
Follow me on Facebook and YouTube for more crafty treats!
Have fun creating!
Einat

Saturday, November 22, 2014

How to create Peeled Paint effect?

If you're like me you really like easy and fun techniques to create striking effects. Well, this peeled paint technique is not new but it's always great to use oth on paper and on canvas. In this Saturday MIXTRAVAGANZA video tutorial will be using this technique on a canvas.


Start by covering the canvas with a paper to create your background base. If you're using a double sided cardstock like me then check out the video to find out how to soften it with water and making it more flexible to work with so covering the canvas will be easy. Once the canvas is covered seal the paper with Gel Medium. Sealing the paper is very important for the next steps. If you're doing this technique on paper the process will be exactly the same.


In order to create the peeling effect, which is basically a resist technique, use Vaseline. Apply it to the areas where you want the paint to peel. Then paint all over it with acrylic paint. The water base acrylic will not stick to the oily Vaseline creating the peeling effect. Dry the paint and use a paper towel to remove the paint.


If you want a multi color effect then repeat this process using a different color each time. To finish the canvas I added a few words in different techniques: stenciling, stamping and painting chipboard letters.


For all the details, tips and full process watch the video tutorial!
Follow me on Facebook and YouTube for more crafty treats!

Have fun creating!
Einat

Sunday, October 19, 2014

3D Reverse Canvas Mother Goose Frame

Mother Goose is such a lovely character that brings back childhood memories, nursery rhymes and fun moments. I have the Graphic 45 Mother Goose paper collection for awhile and I wanted to create something that I can combine with a photo of my kids.


So I went through a lot of photo until I found the right one where they were sitting down and the background was contrasted enough for me to cut out. Then I had to adjust the size of their image with the sizes of images on the paper. I measured the images on the paper and enlarged the kids' images in Photoshop accordingly. Then I simply cut out the image and I was ready to go.


I took an 8X8 canvas reversed it and covered it with paper to create the frame. Then I started layering cut out images from the paper onto the frame. Each layer was attached to the frame with a different height of 3D foam tape so the layers created the depth of the entire scene. I also added the photo of my kids. Finally I added images on the front of the frame.


Now I can decorate the wall in my studio with a great reverse canvas Mother Goose 3D frame! Try this technique to create your own frame. Check out the video for a step by step full tutorial.

Follow me on Facebook and YouTube for more crafty treats!

Have fun creating!
Einat

Saturday, September 20, 2014

Mixed Media Canvas: In My Mind

As artists we rarely create something about ourselves, at least I hardly do. It's always a layout about the kids or a mini album for grandma with photos that we took so we're not in them. This time I wanted to create something for myself about myself.


I was inspired by a crazy sketch I saw online that shows how an artists mind looks. And I immediately related because my mind sometimes looks and feels the same. So I created a canvas describing the things I have in my mind all jumbled up, but fun and creative.


I used a really easy technique to create my silhouette. I took a photo of myself in profile and printed it. Then I cut around the image and turned it over to use the blank side. I filled the silhouette with embellishments and findings that have meaning for me and say something about me.


I created the background of the canvas with color sprays and added the journaling with a pen nib and black ink. This was really fun and inspiring to create.
Try to create an art piece, a layout or a project about you, it's liberating!
Don't forget to watch all the tips and tricks in the video!


Follow me on Facebook and YouTube for more crafty treats!

Have fun creating!
Einat

Tuesday, August 19, 2014

Mixed Media Canvas - "Layers of Color"

Sometimes all you need are a few stencils and paints and you can create an amazing work of art full of colors and shapes. If you are not the artsy type and you want to get your legs wet and your fingers dirty this is the easiest way to get started with 12X12 canvases.


It's all a matter of coordinating your color palette and using the right kind of stencils. The right kind of stencils is not necessarily by a specific company, or in a specific size, what matters is the pattern, the shapes on the stencils and their size. The idea is to layer different patterns and different colors and create a rich design.

Start with the lighter, palest colors as background and add bolder colors on top of them. if you want to keep layering more texture and patterns add lighter colors with large patterns on top of the stronger colors so they will stand out.

There is no right or wrong here. Just start and have fun. Always remember that if you don't like the result you can cover the entire canvas with white gesso and start again!

Follow me on Facebook and YouTube for more crafty treats!

Have fun creating!
Einat

Sunday, June 29, 2014

Mixed Media Double Canvas Set

I decided to change my wall art a little, so I created a canvases set. A set is basically one piece of art that spreads on more than one canvas. In my case two 6" X 6" canvases. When you create a set you work on the canvases as if they were one. So the theme, color scheme and embellishments will be the same across the board. The divided yet cohesive look to a canvas set gives it a unique look and draws the eyes to move from one section to the other and by doing so capturing the entire piece.


I started the set with adding modeling paste texture to the background and pieces of tissue paper for layering effect. Then I added distress stains in different colors and blended them together.
My focal point is a leaf ribbon that spreads from top to bottom and is embellished with flowers that were colored with the same distress stains.


I also added a large wood butterfly which was colored with distress stains. I finished the canvas set with Perfect Pearls paint that I created myself by adding a little water. This shiny effect gave the canvases a shimmery finish and definition.


Have you ever tried to create your own canvases set? You can create a row of three or a large square that is made up from four small canvases. Take a look at the video tutorial for more ideas and techniques.

Follow me on Facebook and YouTube for more crafty treats!
Have fun creating!
Einat

Saturday, January 25, 2014

Mixed Media Canvas layout

Hi crafty friends! I want to share with you a really fun project I created for Basically Bare… a canvas layout. This is not a layout on a framed canvas but a layout on a 12X12 canvas fabric for scrapbooking! This is so much fun to play with…


For those of you who never created a page from canvas let me assure you it’s not as scary as it might look. You just need to look at it as working with a 12X12 paper, add all the fun things you can do with it that you can’t do with paper and you get the perfect mix for an amazing project!


I started by unpicking slits I made in the canvas. That created a really cool look of unraveled threads that you can’t get when distressing or tearing paper. I did the same thing on all three edges of the canvas. Then I sprayed the canvas with different color sprays. At this point it’s important to remember two thing: first, the color sprays don’t blend as much on fabric like they do on paper. Second, it takes a lot longer to dry the canvas because it absorbs the spray much more than paper. After the canvas is dry I added a circle pattern with modeling paste and stencil. Then I added some more texture to the background with another stencil and distress inks.


I added the photos and then layered pieces of paper and ribbons around them. A good tip is to put the glue only on the middle of the photo and then it’s much easier to tuck things under it later. I added buttons, flowers, and punched stars. I even used some of the threads I unpicked. Just goes to show you that it’s always good to think twice before throwing something:-) I added the title and my layout was done!

I really recommend trying creating a layout on fabric at least once…it’s fun, it’s different and it’s challenging! AS always you can watch the step by step video tutorial!

Have fun Creating!
Einat