Life as an artist seems to be very glamorous. Traveling the world, meeting new people and doing what you love is rewarding, fulfilling and fun. However there are things and events behind the scenes that are hidden from the public eye. There are so many good things about being an artist but so many bad things too. Disappointments, failures and rejections are things we all have to deal with and it's never easy. Here are a few of my behind the scenes stories...
The Class that Never Happened
One of my favorite things is to teach and share my knowledge with others. There is a great deal of satisfaction in watching someone go through a process and the light in their eyes when they get it or make an artistic breakthrough. So it's equally devastating when you prepare and get ready for it but it doesn't happen. It's even more annoying when you make a project on your time and never get paid for it because the class never happened. It happens more often than you think because not enough people register for the class. So I end up investing time in creating the project which is eventually wasted, scheduling the time and date which is closed for anything else and finally didn't get the income I thought I would.
Last Minute Video Tutorial
I share a video tutorial on my channel every week. But every week it almost doesn't happen! Why? Because I always wait to the last minute to make it. When you wait until the last minute you always get unexpected things you didn't prepare for that interfere with the ability to do what you planned to do. So every friday morning I sit down to film my video hoping that there will be no surprises Lol. Will I ever learn?
Eye opening right?
There are many more stories about contracts that were not honored, impermeability and plain ugly behaviour. But there are also amazing stories about new goals achieved, successes and flattering adventures. All are behind the scenes industry secrets but also my personal stories.
You can read all about these stories on my creative newsletter. I share a new story every month!
You can subscribe to the Einat Kessler creative newsletter and make sure you don't miss anything!
Have fun creating!
Showing posts with label crafts. Show all posts
Tuesday, November 3, 2015
Life as an Artist - Behind the Scenes Secrets
Tuesday, October 27, 2015
5 Minutes Craft - Mummy TP Trick or Treat Boxes
There's just enough time to make these spook-tacular easy and fun toilet paper rolls mini Trick or Treat boxes and fill them with yummy candies. All you need are a few TP rolls that instead of finding their way to the bin can be used to create last minute party favors.
This is a great craft to do with your kids or in school. It only takes 5 minutes to create the box, wrap it with a white bandage you can get at the pharmacy and add a face. The face is the really fun part because you can create all kinds of spooky faces with as many eyes or teeth that you want!
Don't miss out! Keep up with all the crafty goodness by subscribing to the Einat Kessler creative newsletter
This is a great craft to do with your kids or in school. It only takes 5 minutes to create the box, wrap it with a white bandage you can get at the pharmacy and add a face. The face is the really fun part because you can create all kinds of spooky faces with as many eyes or teeth that you want!
Don't miss out! Keep up with all the crafty goodness by subscribing to the Einat Kessler creative newsletter
Labels:
crafts,
Crafts for kids,
Halloween,
Video tutorial
Tuesday, October 6, 2015
Create Your Own Craft Supplies
I'm a firm believer that if you can make it yourself (and you have the time for it)then definitely Do It Yourself! Craft supplies are no different. There are so many ways to create craft supplies without almost spending nothing or very little money.
So I created a Pinterest board with a collection of home made recipes for creating your own craft supplies.
Some of my favorites are:
There are many more recipes for homemade supplies you can use. Just click on the link and you'll be instantly transported to a world of DIY craft supplies.
Don't miss out! Keep up with all the crafty goodness by subscribing to the Einat Kessler creative newsletter
So I created a Pinterest board with a collection of home made recipes for creating your own craft supplies.
Some of my favorites are:
Homemade stamp/ink Daubers
Make your own Ink Sprays with Inktense Blocks
DIY Pearls
DIY Texture Paste recipe
There are many more recipes for homemade supplies you can use. Just click on the link and you'll be instantly transported to a world of DIY craft supplies.
Don't miss out! Keep up with all the crafty goodness by subscribing to the Einat Kessler creative newsletter
Friday, August 14, 2015
The "Blitsy" Question...what do you think?
If you are not familiar with Blitsy then let me fill you in. It's a huge online store that has amazing sales and prices. My point is not to promote it but to raise a dilemma:
assuming you have a craft store where you live where would you buy your supplies, in your local craft store where the prices might be higher or online where the prices might be cheaper?
On a first glance there is no question right? I would buy my craft supplies where it's cheap! But...if we all buy craft supplies online where it's cheap what will happen to the brick and mortar craft stores? they'll have to close for lack of sufficient income. When the number of stores decline, companies sell less of their products and they eventually close too. This starts a snow ball where the end result is the reduction of the entire craft industry.
We've all seen it during the last few years. of course there were other reasons like over saturated market, and online stores are stores which sell companies' products. However, When supplies are only bought online, something of the experience gets lost. When there is no brick and mortar store around, there is no community, no classes or crop nights. It's true that online communities are flourishing and so does online classes but the market is changing and shrinking. too many companies and websites have closed recently...
So back to my original question...would you buy at your local store where you might need to spend more on one hand but support the store on the other, or would you buy cheaper supplies online and let the market work out these things and what happens happens? Share yout thoughts in the comments.
Don't miss out! Keep up with all the crafty goodness by subscribing to the Einat Kessler creative newsletter
assuming you have a craft store where you live where would you buy your supplies, in your local craft store where the prices might be higher or online where the prices might be cheaper?
On a first glance there is no question right? I would buy my craft supplies where it's cheap! But...if we all buy craft supplies online where it's cheap what will happen to the brick and mortar craft stores? they'll have to close for lack of sufficient income. When the number of stores decline, companies sell less of their products and they eventually close too. This starts a snow ball where the end result is the reduction of the entire craft industry.
We've all seen it during the last few years. of course there were other reasons like over saturated market, and online stores are stores which sell companies' products. However, When supplies are only bought online, something of the experience gets lost. When there is no brick and mortar store around, there is no community, no classes or crop nights. It's true that online communities are flourishing and so does online classes but the market is changing and shrinking. too many companies and websites have closed recently...
So back to my original question...would you buy at your local store where you might need to spend more on one hand but support the store on the other, or would you buy cheaper supplies online and let the market work out these things and what happens happens? Share yout thoughts in the comments.
Don't miss out! Keep up with all the crafty goodness by subscribing to the Einat Kessler creative newsletter
Friday, August 7, 2015
The Right Tool For The Right Cut?
I was recently asked about how I cut paper. I wanted to answer right away, but then I realized the answer is not as clear as I thought it was. There are different ways to acheive the same result and each crafter has its own prefrances and tools. Join the discussion and share what you like to use.
General Cutting
When you are faced with a task of cutting a piece of paper you basically have two options: A craft knife and scissors right? Wrong! Because you have different kinds of knives and scissors andtrimmers and cutters and the list is almost endless. So How do you know what to use for what?
Streight Cut
The best way to cut a streight cut is to use a trimmer. It is fast, accurate and easy. I use it whenver Ineed to cut squares of paper, like a12x12 page in half. However sometimes I use scraps of paper that are not in a square shapeor have no shape at all. That makes aligning it on the trimmer impossible or at least too time consuming. So in this case I use a craft knife.
There are two types of knives: Utility knife and a craft knife. Which one to use is a personal preferance. I feel more comfortable with a utility knife. I feel like my grip is better and my hand is steadier.
Which method do you use?
Not Streight Cut
If you're anything like me you are constantly fussy cutting flowers, images,photos etc. If you ask me I'll tell you i use scissors, the big Tim Holtz ones,even for really fussy cutting. But some people will say using a craft knife is much more comfortable and easy. I really want to try the craft finger knife...anybody uses that?
Two things to remember: first, always use a cutting mat to protect your table and second: use a different pair of scissors for each material. Don't cut paper and fabric with the same scissors. I have managed to ruin both my previous desk and a few scissors because I didn't follow these rules :)
Please share in the comments what's your favorite cutting tools.
Don't miss out! Keep up with all the crafty goodness by subscribing to the Einat Kessler creative newsletter
General Cutting
When you are faced with a task of cutting a piece of paper you basically have two options: A craft knife and scissors right? Wrong! Because you have different kinds of knives and scissors andtrimmers and cutters and the list is almost endless. So How do you know what to use for what?
Streight Cut
The best way to cut a streight cut is to use a trimmer. It is fast, accurate and easy. I use it whenver Ineed to cut squares of paper, like a12x12 page in half. However sometimes I use scraps of paper that are not in a square shapeor have no shape at all. That makes aligning it on the trimmer impossible or at least too time consuming. So in this case I use a craft knife.
There are two types of knives: Utility knife and a craft knife. Which one to use is a personal preferance. I feel more comfortable with a utility knife. I feel like my grip is better and my hand is steadier.
Which method do you use?
Not Streight Cut
If you're anything like me you are constantly fussy cutting flowers, images,photos etc. If you ask me I'll tell you i use scissors, the big Tim Holtz ones,even for really fussy cutting. But some people will say using a craft knife is much more comfortable and easy. I really want to try the craft finger knife...anybody uses that?
Two things to remember: first, always use a cutting mat to protect your table and second: use a different pair of scissors for each material. Don't cut paper and fabric with the same scissors. I have managed to ruin both my previous desk and a few scissors because I didn't follow these rules :)
Please share in the comments what's your favorite cutting tools.
Don't miss out! Keep up with all the crafty goodness by subscribing to the Einat Kessler creative newsletter
Tuesday, August 4, 2015
How To Swim Across The Ocean?
Our creative minds constantly come up with new ideas, at least mine does. I have so many big ideas running in my head. I have a little notebook that I carry everywhere to write them all down. All my great ideas are like an ocean and accomplishing them is like swimming across it...seems like an impossible mission right?
Your ocean might be learning a new craft, starting an art journal or finishing your family scrapbook. Swimming across your ocean will only be successful if you'll be determined, inspired and focused. You'll need to do it one stroke at a time. You will need to overcome the waves, the sharks and the cold, which are all your inner fears and demons. " I'm not good at art so I can't art journal", I'll never learn how to do mixed media projects because I can never be as good as those amazing artists", I have too many photos so there's no chance I'll finish this scrapbook in my lifetime". Sounds familiar?
Like the four swimming strokes there are four steps to swim across the ocean:
Focus
What I want to get done. Write down all the things you need to get done to achieve your craft goal. Break down your ocean to little strokes or yards. For example: in order to start an art journal I need to: overcome my fear, get supplies, come up with themes for the first 10 pages, look for inspiration on line etc.
Map Out
Map out each step. Break down each step to smaller steps. For example: in order to overcome my fear of art journaling I need to use a prompt I like and create one page.
Schedule
Schedule all your steps in your calendar now! This way you will have structure, order and continuity.
Trust
Trust the process. The progression will come from small actions every day. Going back to the art journal example...once you've done the first page it'll get easier and easier.
So put your excuses aside, put on your swimsuit and go...swim across your ocean!
Please share in the comments what is your ocean and maybe I can help you with a fresh perspective.
Don't miss out! Keep up with all the crafty goodness by subscribing to the Einat Kessler creative newsletter
Your ocean might be learning a new craft, starting an art journal or finishing your family scrapbook. Swimming across your ocean will only be successful if you'll be determined, inspired and focused. You'll need to do it one stroke at a time. You will need to overcome the waves, the sharks and the cold, which are all your inner fears and demons. " I'm not good at art so I can't art journal", I'll never learn how to do mixed media projects because I can never be as good as those amazing artists", I have too many photos so there's no chance I'll finish this scrapbook in my lifetime". Sounds familiar?
Like the four swimming strokes there are four steps to swim across the ocean:
Focus
What I want to get done. Write down all the things you need to get done to achieve your craft goal. Break down your ocean to little strokes or yards. For example: in order to start an art journal I need to: overcome my fear, get supplies, come up with themes for the first 10 pages, look for inspiration on line etc.
Map Out
Map out each step. Break down each step to smaller steps. For example: in order to overcome my fear of art journaling I need to use a prompt I like and create one page.
Schedule
Schedule all your steps in your calendar now! This way you will have structure, order and continuity.
Trust
Trust the process. The progression will come from small actions every day. Going back to the art journal example...once you've done the first page it'll get easier and easier.
So put your excuses aside, put on your swimsuit and go...swim across your ocean!
Please share in the comments what is your ocean and maybe I can help you with a fresh perspective.
Don't miss out! Keep up with all the crafty goodness by subscribing to the Einat Kessler creative newsletter
Friday, July 10, 2015
The Great Glue Guide
Using the right glue for a project can be a confusing task. Especially when you take a trip down the adhesives aisle at a craft store there are MANY options! How do you know what adhesive to pick for which project, you don't know? Well, here's the ultimate guide to adhesives that will help you make sense out o all the options out there! This list is by no means exhaustive, more a brief overview of some of the main glues and adhesive products you might come across.
Apart from being an adhesive, with lots of chemicals that we don't need to know here, used to fix or bind things together, it is worth knowing a bit about the different types of glues available and what they are actually made of. You then need to match the glue to the material you are using and take into account the weight and texture as well as the purpose of your project. Here are some of the glues we use on our projects.
Glue Sticks
These are probably the most common glues that you come across in paper crafting and they are very useful. Stick glues are water based, made up of water, polymer, thickener and additives and will not stick to non-porous surfaces like plastic.The glue is solid and formed into a stick which you wind up and down like a lipstick. They are easy to use and you can apply the glue reasonably accurately. Glue sticks are ideal for sticking paper and card, which makes them useful for card making and other paper crafts.
White Glue or PVA
PVA (Polyvinyl Acetate) often called White Glue is a water based wet glue which dries clear. These glues are very commonly used and come in a variety of strengths. White glues are ideal for where extra strength is required, for children's crafts, for example, junk modelling, making pasta pictures or papier mache. They take a while to dry so you must be patient when using this kind of glue. They can also make your project soggy if you use too much at once and this will end up warping your card.
PVA glues are designed to work on porous materials, so like stick glues, they are not used for gluing plastics. You can add glitters or paints to PVA before using to get interesting effects and if you dilute it a little with water, it makes a good varnish on clay models. It can also be used this way to form a base coat for painting.
There are many brands of white glue, my favorite is Tacky Glue which is permanent, dry clear and acceptable for general use, paper. All but the clear are also acceptable for use on Styrofoam, wood, ceramics and fabric.
Gel mediums
Is permanent, dries clear and acceptable for use on paper, Styrofoam, wood, ceramics and fabric. Uses include as a glue, decoupage medium and finishing top coat. There are a wide variety of formulas. My favorite is Mod Podge and Ranger.
Glue Guns
Glue is supplied in the form of glue sticks which you insert into your glue gun. The glue is heated up inside the gun and comes out as a very hot runny substance with rather a stringy quality. You can get hot melt glue guns and lower temperature glue guns which are ideal for gluing things like foam, polystyrene or flower arranging oasis.
Glue Dots
Glue dots are often found in packaging and provide a quick and secure way of fastening things. Think of freebies on magazines, which are usually stuck on with glue dots. They provide instant adhesion, with no drying time and can be found in different types of adhesive from removable, semi-removable and permanent fixing. They are often used for attaching embellishments where a glue gun would be messy to use and most will adhere to different non-porous surfaces such plastic, glass, metal and vinyl. Glue dots are also useful when sticking ribbons and lacy borders.
Glue Pens
Glue pens provide a liquid adhesive in a handy pen format. This gives the ability to apply adhesive quite accurately and this can be handy when you are scrapbooking or you want to write in glue and perhaps add glitter to get glitter wording. As they are wet glues, they are best used for paper and card and will not usually be very successful with securing embellishments. The glue will dry clear and depending on the pen, it may be repositionable once dry. The glue in glue pens is usually solvent free and washable in water, making it ideal for kids to use.
Spray Glue
There are many different types of spray glues around which will bond a range of different materials. You might find, repositionable, super strength, high tack, general, photo mount, foam sprays etc so you will need to look at each can to choose the right spray for your project. These glues are often found in locked display cabinets because they contain propellants that are toxic and so these glues are not suitable for use with children. They should always be used in well ventilated areas.
Spray glues are good for adhering paper to just about anything and the bond is very strong and dries clear. A high tack spray will adhere almost instantly. Spraying inside a cardboard box is a good way of containing the spray, much like you would do if you were spray painting something.
Double-sided Tapes
Double-sided tape is really useful to have in your crafting toolbox. Because it is not a glue, it is not messy, you are not going to get the warping effect when you use too much and you will get an instant bond. However, this latter feature can work for and against you. I find that I need to move things about to position them on a project as I very rarely get it right first time. Once the papers or cards are stuck down, you really won't be able to move them without tearing and ruining your project. You need to be very sure about the placement of your items. My favorite brand is Score Tape, which comes in various sizes and is very strong.
Rubber Cement
Intended for primarily paper crafting and can be used for temporary or permanent adhesion, this glue is acid free. There are three methods when using rubber cement: wet mount, dry mount and combination mount that should be outlined on every bottle. Works well when making binding on homemade notebooks and makes a pretty believable fake booger
Paper Glaze
This adhesive is for paper crafting and is common in scrap-booking. While more expensive than traditional glues, it contains no acid and will never yellow with age making it perfect for keepsakes. When applied in thin coats it can be used to laminate images. Dries clear when applied in thin layers.
E-6000
Whenever I say “strong glue” in a DIY I always follow it with e-6000. Industrial strength, it is suggested for general use, wood, ceramics, fabric, metal and natural materials and it dries clear.
To use apply a small amount and allow to sit until it becomes tacky. Then press the two items together. If you try to use immediately, your top bit will slide around like crazy. It must be used in a properly ventilated area.
I hope you found this guide eye opening and helpful. I'll be happy to answer any questions you might have.
Don't miss out! Keep up with all the crafty goodness by subscribing to the Einat Kessler creative newsletter
Have fun creating!
Friday, July 3, 2015
Help Me Decide
Crafty life presents its challenges and questions. I'm not talking about how much money to spend on a product or making the decision tobuy or not to buy. I'm talking about important stuff like which project to create first, how to decorate your craft room or which altering method to use in a project. You know...important questions :)
Sometimes it's really hard to make these decisions myself so I decided to share these questions with you! Every month in my newsletter I will ask your opinion on a different design or craft issue and ask you to help me decide which way to go!
The first question I wanted your help with was regarding this old suitcase that I had for awhile. I really love it but have no idea what todo with it. Alter it? Restore it? Not touch it?.....
If you want to help me decide sign up for the Einat Kessler creative newsletter and join the exclusive group of people that will be a partofmycreative life!
Have fun creating!
Sometimes it's really hard to make these decisions myself so I decided to share these questions with you! Every month in my newsletter I will ask your opinion on a different design or craft issue and ask you to help me decide which way to go!
The first question I wanted your help with was regarding this old suitcase that I had for awhile. I really love it but have no idea what todo with it. Alter it? Restore it? Not touch it?.....
If you want to help me decide sign up for the Einat Kessler creative newsletter and join the exclusive group of people that will be a partofmycreative life!
Have fun creating!
Tuesday, June 16, 2015
Father's Day Roundup
Father's Day is just around the corner so I've found a few cool ideas for gifts and cards to make all of your daddies happy!
For this gift you only need two things: a large mug and a black Sharpie pen. Write whatever you want on a mug and you have a personalized useful gift. You know your dad the best so you can come up with just the right think to write: a quote, something funny or even draw if you know how.
This is a great idea even for those dads who don't where ties. I also like this idea because it can be personalized according to whatever your dadlikes. You can put anything inside the goodie bag!
Here's how to create it.
Continuing with the tie theme her's a really cute idea for a card.
Here's a card I created using sand paper of different rades and some nails. You can find a full tutorial here.
A yummy present with your father's favorite drink and snack! Here's how it's done!
This is an amazing card! There are no instructions on the website but there are a few close up photos that might be useful if you want to try and create one. Here's the link
For those f you who are looking for a funny gift here's a crazy idea...embellish your father's golf balls. That'll make him the most unique golfer in the club!
Don't miss out! Keep up with all the crafty goodness by subscribing to the Einat Kessler creative newsletter
For this gift you only need two things: a large mug and a black Sharpie pen. Write whatever you want on a mug and you have a personalized useful gift. You know your dad the best so you can come up with just the right think to write: a quote, something funny or even draw if you know how.
This is a great idea even for those dads who don't where ties. I also like this idea because it can be personalized according to whatever your dadlikes. You can put anything inside the goodie bag!
Here's how to create it.
Continuing with the tie theme her's a really cute idea for a card.
Here's a card I created using sand paper of different rades and some nails. You can find a full tutorial here.
A yummy present with your father's favorite drink and snack! Here's how it's done!
This is an amazing card! There are no instructions on the website but there are a few close up photos that might be useful if you want to try and create one. Here's the link
For those f you who are looking for a funny gift here's a crazy idea...embellish your father's golf balls. That'll make him the most unique golfer in the club!
Don't miss out! Keep up with all the crafty goodness by subscribing to the Einat Kessler creative newsletter
Tuesday, June 2, 2015
How to Match Colors?
Why is it some colors go so well with others and some don't? is it a matter of pesonal taste or are there rules we can follow? Today I'm trying to make sense of it and help you mix and match!
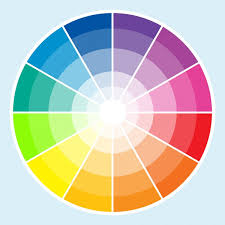
There are three basic things you need to think about regarding color: the color wheel, color harmony, and the context of how colors are used.
The Color Wheel
A color circle, based on red, yellow and blue, is traditional in the field of art. Sir Isaac Newton developed the first circular diagram of colors in 1666. Since then, scientists and artists have studied and designed numerous variations of this concept. There are three primary definitions based on the color wheel:
Primary Colors
Red, yellow and blue. A primary color is a color that cannot be made from a combination of any other colors. All other colors are derived from these 3 colors.
Secondary Colors
Green, orange and purple. A secondary color is a color created from a combination of two primary colors.
Tertiary Colors
Yellow-orange, red-orange, red-purple, blue-purple, blue-green & yellow-green. Tertiary color is a combination of three colors: primary and secondary.
Description of Color
Hue – Is the name of the color itself, the dominant wavelength of light or the choice of pigment.
Lightness (brightness) – Is the lightness or darkness of the color, the amount of light reflected or transmitted.
Saturation – Is the level of white, black or grey, ranges from neutral to brilliant (pastel to full color).
Tint – Base color plus white.
Tone – Base color plus grey.
Shade – Base color plus black.
Value – How light or dark a color is.
Aggressive - AKA 'Warm'. The yellows, oranges, and reds. These come towards the eye more (spatially) and are generally 'louder' than passive colors.
Passive - AKA 'Cool'. The greens, blues, and violets. These recede from the eye more (spatially) and are generally 'quieter' than the aggressive colors.
Color Harmony
In visual experiences, harmony can be defined as a pleasing arrangement of colors, something that is pleasing to the eye. It engages the viewer and it creates an inner sense of order, a balance in the visual experience. When something is not harmonious, it's either boring or chaotic.
Some Formulas for Color Harmony:
Analogous colors are any three colors which are side by side on a 12 part color wheel, such as yellow-green, yellow, and yellow-orange. Usually one of the three colors predominates.
Complementary colors are any two colors which are directly opposite each other, such as red and green and red-purple and yellow-green. These opposing colors create maximum contrast and maximum stability.
Monochromatic – A monochromatic color scheme is a one-color scheme. However, the color can be neutralized by adding its complement to lower the intensity of the color. Black and white can also be used to darken and lighten the value of the color. It is achieved by using one color or hue, utilizing that colors’ various tints, tones and shades.
Color Triad – A triadic color scheme are colors that are an equal distant from each other on the color wheel. Any three colors equidistant around the color wheel form a triad and can be used in this color scheme (eg., red, yellow and blue). Semi-neutrals are mixed using two of the colors in the triad and the third can be added to further neutralize the pair.
Color Context
How color behaves in relation to other colors and shapes. Compare the contrast effects of different color backgrounds for the same red square. Red appears more brilliant against a black background and somewhat duller against the white background. In contrast with orange, the red appears lifeless; in contrast with blue-green, it exhibits brilliance. Notice that the red square appears larger on black than on other background colors.
There are three basic things you need to think about regarding color: the color wheel, color harmony, and the context of how colors are used.
The Color Wheel
A color circle, based on red, yellow and blue, is traditional in the field of art. Sir Isaac Newton developed the first circular diagram of colors in 1666. Since then, scientists and artists have studied and designed numerous variations of this concept. There are three primary definitions based on the color wheel:
Red, yellow and blue. A primary color is a color that cannot be made from a combination of any other colors. All other colors are derived from these 3 colors.
Secondary Colors
Green, orange and purple. A secondary color is a color created from a combination of two primary colors.
Tertiary Colors
Yellow-orange, red-orange, red-purple, blue-purple, blue-green & yellow-green. Tertiary color is a combination of three colors: primary and secondary.
Description of Color
Hue – Is the name of the color itself, the dominant wavelength of light or the choice of pigment.
Lightness (brightness) – Is the lightness or darkness of the color, the amount of light reflected or transmitted.
Saturation – Is the level of white, black or grey, ranges from neutral to brilliant (pastel to full color).
Tint – Base color plus white.
Tone – Base color plus grey.
Shade – Base color plus black.
Value – How light or dark a color is.
Aggressive - AKA 'Warm'. The yellows, oranges, and reds. These come towards the eye more (spatially) and are generally 'louder' than passive colors.
Passive - AKA 'Cool'. The greens, blues, and violets. These recede from the eye more (spatially) and are generally 'quieter' than the aggressive colors.
Color Harmony
In visual experiences, harmony can be defined as a pleasing arrangement of colors, something that is pleasing to the eye. It engages the viewer and it creates an inner sense of order, a balance in the visual experience. When something is not harmonious, it's either boring or chaotic.
Some Formulas for Color Harmony:
Analogous colors are any three colors which are side by side on a 12 part color wheel, such as yellow-green, yellow, and yellow-orange. Usually one of the three colors predominates.
Complementary colors are any two colors which are directly opposite each other, such as red and green and red-purple and yellow-green. These opposing colors create maximum contrast and maximum stability.
Monochromatic – A monochromatic color scheme is a one-color scheme. However, the color can be neutralized by adding its complement to lower the intensity of the color. Black and white can also be used to darken and lighten the value of the color. It is achieved by using one color or hue, utilizing that colors’ various tints, tones and shades.
Color Triad – A triadic color scheme are colors that are an equal distant from each other on the color wheel. Any three colors equidistant around the color wheel form a triad and can be used in this color scheme (eg., red, yellow and blue). Semi-neutrals are mixed using two of the colors in the triad and the third can be added to further neutralize the pair.
Color Context
How color behaves in relation to other colors and shapes. Compare the contrast effects of different color backgrounds for the same red square. Red appears more brilliant against a black background and somewhat duller against the white background. In contrast with orange, the red appears lifeless; in contrast with blue-green, it exhibits brilliance. Notice that the red square appears larger on black than on other background colors.
One of the online tools I like to use is by www.scrapbook.com. You can find out which colors match a specific color or a photo you want to use. For eacg color scheme it offers different options like monochromatic, complimentary and more. (I don't get paid to recommend this, i just like it). here's an example with a photo of me.
What is your favorite color? Which colors do you like to use with it? Share with me in a comment.
Don't miss out! Keep up with all the crafty goodness by subscribing to the Einat Kessler creative newsletter
Friday, May 29, 2015
Is it my new addiction?
I just found These Smash books in fifth of the price they normally sell here. With high customs, shipment etc, Smash books' prices are really high, but I found these at the same price they sell in the US.
Even though they are the old design I couldn't resist and I took 4. Now the question is...will this be my new addiction? I love this concept of scrapbooking journaling. It goes back to the basics of what scrapbooking used to be - documenting memories. Pages with lots of journaling and a few photos. Sounds perfect for our summer vacation.
Only time will tell...
What do you think. Will I be hooked or not?
Have fun creating!
Even though they are the old design I couldn't resist and I took 4. Now the question is...will this be my new addiction? I love this concept of scrapbooking journaling. It goes back to the basics of what scrapbooking used to be - documenting memories. Pages with lots of journaling and a few photos. Sounds perfect for our summer vacation.
Only time will tell...
What do you think. Will I be hooked or not?
Have fun creating!
Saturday, September 27, 2014
Matchbox Vanity
I've always been fascinated by miniatures. The other day I stumbled upon a website of an artist who creates amazing miniature foods. It looks so real it's unbelievable. If you want to check it out here's the link. This has inspired me to create a miniature vanity, my style, meaning paper crafting and paper engineering vintage style.
I created the vanity from 10 matchboxes stacked up together in two stacks. I first inked all the edges and covered the front with patterned paper. I used The Station collection from MME.
Once all the matchboxes were glued together I covered all sides with chipboard so the vanity will be stronger and more real looking. I covered the chipboard with the same patterned papers.
For the embellishments on the top I used craft supplies that I converted into different things that are usually found on a vanity. The photo frames are bezels used to create pendants and jewelry. I cut off the ring of the pendant and turned it into a frame by adding a stand on the back. The mirror is also a bezel with an oval shape. The bottles were created from beads, a large bead for the bottle and a smaller one for the lid.
You should try to create a miniature, it's really fun and satisfying to create something from start to finish and make it look as real as possible. Make sure to watch the step by step video tutorial for all the details.
Follow me on Facebook and YouTube for more crafty treats!
Have fun Creating!
Einat
I created the vanity from 10 matchboxes stacked up together in two stacks. I first inked all the edges and covered the front with patterned paper. I used The Station collection from MME.
Once all the matchboxes were glued together I covered all sides with chipboard so the vanity will be stronger and more real looking. I covered the chipboard with the same patterned papers.
For the embellishments on the top I used craft supplies that I converted into different things that are usually found on a vanity. The photo frames are bezels used to create pendants and jewelry. I cut off the ring of the pendant and turned it into a frame by adding a stand on the back. The mirror is also a bezel with an oval shape. The bottles were created from beads, a large bead for the bottle and a smaller one for the lid.
You should try to create a miniature, it's really fun and satisfying to create something from start to finish and make it look as real as possible. Make sure to watch the step by step video tutorial for all the details.
Follow me on Facebook and YouTube for more crafty treats!
Have fun Creating!
Einat
Labels:
3D designs,
altered art,
craft,
crafts,
paper crafts,
Paper Engineering,
Paper Projects,
Saturday MIXTRAVAGANZA,
Technique,
Tutorials,
Video tutorial
Subscribe to:
Posts (Atom)