What I love about Ann Butler's Faux Quilting stamps is that they work great on fabric as they do on paper. All you need is to use your heat tool to dry and set them. I'm not a sewer but I wanted to try creating a project with fabric so I'll be able to share their versatility.
I started with arranging 1" faux quilting stamps on my block and stamped a piece of cheesecloth. I used Ann Butler's Crafter's Ink by Clearsnap to stamp the fabric. I applied the ink randomly on the stamps so I'll get a blending colors effect.
After the ink was dry I cut a few pieces of filler to fit a small frame that I wanted to use. I placed the fabric with the pattern face down and pushed the filler through the frame, creating a raised cushion.
I added a few buttons and pins to finish the project. Now I will have a decent place for my pins, not that I have so many, but at least I won't have to stick them in the eraser...
This is the easiest fastest project ever and it can fit any holiday or occasion if you just change the colors. I made it green so it'll fit a christmas table, but it can easily be in any other color for an anniversary, New year's Eve or even Valentine's Day.
To create this napkin holder align a few 1" Faux Quilting stamps in a row and stamp a piece of white cardstock. You can also alternate colors and stamp each square with a different color. That look will be great for a New Year's Eve party for example. Then cut the strip of paper around the stamped area.
Punch two butterflies or any other shape you want or that fits your event. On the first butterfly, create a cut in the center of the butterfly going from the bottom only until the middle of the butterfly. On the other butterfly start the cut from the top going all the way to the middle of the butterfly's body.
Attach each butterfly to the edge of the strip. To close the napkin holder simply attach the butterflies together by inserting each butterfly to the other butterfly's slit.
This project is so easy and quick you can create an entire set for any dinner or party.
Who doesn't love washi tape? We all do! That's why we have stashes of it at home right? But how often do you want a certain pattern, color or images on your washi tape and you don't have it? After all we can't have every single washi tape on the planet. I have a solution for this problem...Create your own washi tape!
It's a much easier task than you think. All you need is a medical tape which is low tack and semi transparent that you can find it in the drug store, stamps and ink. I used Ann Butler Faux Quilting 1" Stamps and Ann Butler Crafter's Ink by Clearsnap.
I played around with the ink and stamps and here are a few easy and quick techniques for you to try:
1. Simple Pattern
Choose a pattern stamp and a color of ink and stamp repeatedly across the tape.
2. Pattern and Color
Color the tape with ink diluted with water to create a wash effect and a muted background color. Just apply some ink on a craft sheet spritz with water and dip the tape (adhesive side up) in the ink. After it's dry stamp with a pattern.
3. Double Drippage
Repeat the ink technique on item 2 but with two different colors of ink. Dip the tape in both colors creating drippage by moving the ink around.
4. Graduated Pattern
Stamp the tape with a pattern stamp but change the pressure you apply on the stamp so the image will be softer or stronger on the tape.
5. Repeated Pattern
Repeat a a small pattern on the tape to cover a larger area and create a continuous design.
Once your washi tape is ready use it in whatever project you want!
Welcome crafty friends! I hope you're enjoying hopping around and checking out all the great projects. It's amazing how different they are...just goes to show you that creativity is a wonderful thing!
I wanted to try and do something a little different with the Deflecto acrylic frame we got and turn it into a desk organizer.
Here's how to create your own:
I started with a piece of cork and stamped it with Ann Butler Ez' De's Letter Stamps and a black permanent ink. Then I stamped a paper strip with an assortment of Ann Butler 1" Faux Quilting stamps and Ann Butler Crafter's Ink by Clearsnap. I used different stamps to create an interesting pattern. I repeated the process on a second strip of paper.
I attached the cork to the front of the frame with double sided tape and then attached one strip of the paper. I attached the second strip on the bottom of the frame.
I took an old plastic box and cut it in half. I attached another stamped strip of paper to it and attached it to the frame. Finally I stamped the same pattern on the top of a post it with a coordinating color and attached it to the frame next to plastic box.
Now I have a little organizer on my desk for all my notes!
4th of July is almost here and you're probably planning a BBQ, a picnic or a party. Instead of buying expensive decoration why not use papers and stencils to create everything you need to decorate your festivities!
I used Ann Butler's Stars Art Screen to create a white stars' pattern on red and blue papers. I used a white Posca pen, but you can also use white acrylic paint or modeling paste. To create a blue or red pattern on white paper the best thing to use are acrylic paints.
Once your pattern is ready you can create all your decorations. Here are just a few samples and ideas. You can find many more ideas online.
I creates a banner, cupcake toppers, bottle or glass wrapper, mini flags, a rosette and tags. You can customize any decoration by making it larger or smaller, use different papers and create different patterns with the same stencil. This is also a great activity for your kids.
I love creating mini albums but not always use paper. I try to challenge myself to try new materials and see what kind of mini albums they would make. Today I played with fabric. And the best thing is that this mini album doesn't need any sewing at all. So if you don't have a sewing machine or don't know how to sew you can still create this mini album! All you need is some ink, acrylic paint and stamping objects to create this fun project! I'm sure there are some fabric pieces in your stash you can play with...right?
For this mini album you can use any type of cotton fabric or cheesecloth. It needs to be flexible and thin enough to be folded and its texture needs to be the kind you can paint on because it will be covered with gesso to prime it. felt, for example will not work here. This is basically the same process as creating a canvas for the wall only without the frame. We will prime the fabric with the gesso so it will seal the fabric and prevent any absorption of the mediums we will be adding.
Once all the fabric pages have been primed and thoroughly dried we can start adding the patterns, words and colors to the pages. I used Ann Butler's pigment ink by Clearsnap that is suitable for fabric and is permanent after a heat set with a heat tool or an iron. The color scheme I chose was teal, purple and black. I also used black acrylic paint. As usual, I didn't have a plan, so I started adding colors and shapes. The important thing in creating this type of project is layering. Layer colors, words and shapes to create an interesting page with a message. I didn't add photos but it is definitely something you can add. Just make sure everything is completely dry so the photos will not be stained or wet.
To create the different patterns on the page I used Ann Butler's 2" Faux Quilting Acrylic Stamps and found objects like TP roll and an old credit card. You can use whatever objects you have to create stamps in any shape or size. I also used the really cool martha Stewart brushes to add all kinds of lines. Make sure to dry each page before turning it over to work on the other side.
Here are some of the supplies you'll need for this project. Some of these are affiliate links which means if you click the link and make a purchase, I get paid a few coins. This helps me keep on blogging and sharing different projects with you. Thanks in advance for your support, dear friends!
White Canvas Fabric
Fabric Ink
Martha Stewart Brushes
White Gesso
Letter Stamps
Fabric Tac
For all the tips, tricks and a full process check out the video.
How many people do you know that have no creativity at all? They are locked in a structural, boring or colorless thinking. Well...I believe there is no such thing! Everyone has creativity within them they just need to set it free! I created this art journal page to describe this process in color and images.
It's so much fun being on the right side of this page, where your mind is full imagination and the creativity is flowing. That side is full of colors blended together, doodling and shapes and lots of texture. On the other side the colors almost don't exist and if they do they are hidden behind a wall of white noise and distractions.
Setting your creativity free is as easy as this page! I started with stamping and doodling creating a gradual effect of going from straight lines and stamping to curves and swirls. Then I added color, going from white on the left to brighter more vibrant colors on the right.
I added texture with modeling paste and more random stamping and doodling. Finally I added the sentence that tied everything together.
Make sure to check out the step by step video tutorial for the complete process and all tips and tricks!
Follow me on Facebook and YouTube for more crafty treats!
I'm a huge believer in the phrase: “Inspiration exists, but it has to find you working” by Pablo Picasso. I feel it almost everyday. I get my best ideas when I'm working, because creating gets the process rolling and sets the mind to follow.
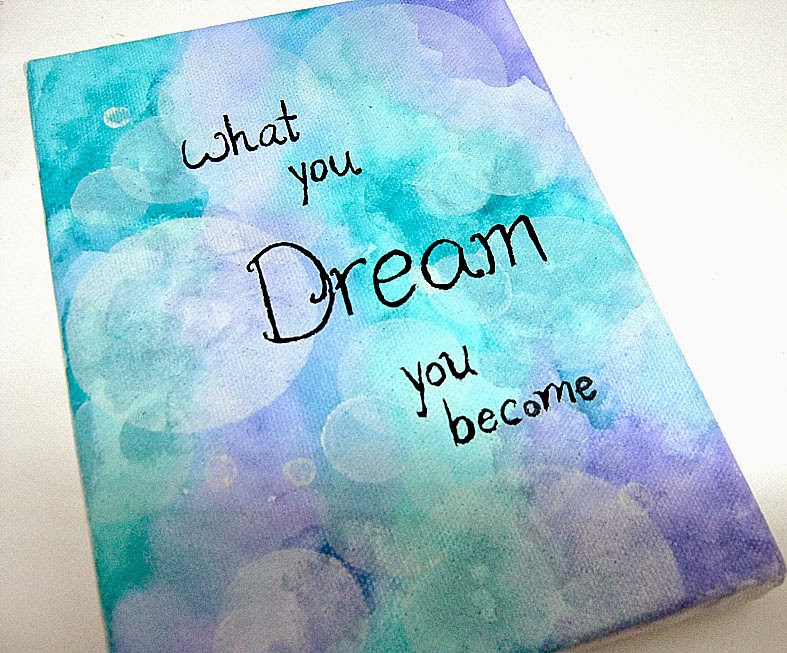
So...I decided to create a wall of inspiration. It'll be a collection of small canvases with phrases and words on different mixed media techniques that I will hang on the wall in front of me and every time I'll look up I'll see this burst of inspiration and creativity!
The first canvas in the collection id DREAM. I created a very muted background with a bokeh effect. I started with converting Ann Butler's Crafter's Ink to water colors with a water pen and layering. I build a colorful background with purple and teal colors in a cloudy dreamy look.
Then I punched a few circles and used the negative cardstock pieces as stencils and created different sizes of circles with white ink and a finger dauber. I layered the circles and spread them around the canvas. When the background was finished I added the sentence with a pen nib and black ink.
What gives you inspiration to create?
Check out the step by step video tutorial for all the details and tips on how to create this canvas with all the water colors effects.
Follow me on Facebook and YouTube for more crafty treats!
Have fun creating!
Einat