pages

Showing posts with label layouts. Show all posts

Sunday, June 21, 2015

3,2,1 Recipe - Mixed Media Layout

I was So happy you liked the last video in this series and even happier that you asked me to do more! So here's another recipe for a mixed media layout using 3 ingredients:
3 Techniques for adding paper flowers on a layout
2 Stencils
1 Acrylic medium


The purpose of these layouts is to show that you don;t have to use a lot of materials or fancy embellishments to create a beautiful layout. Sometimes we lose sight of what's important and that is NOT the embellishments it is the photo, the story we're telling! Everything around it is there to support the photo and the story. After all that's why we're scrappin' right?

3 Techniques
These are not new techniques, but it's a good reminder to how paper is versatile and how much you can create from it. Of course there are more techniques out there, but I think these are the easiest and fastest.


2 Stencils
Stencils are a great way to add dimension, texture, versatility and interest to a layout. It can be a part of the background, an embellishment, title or texture. You can pair it with many materials such as paint, ink, sprays and more. When you use more than one stencil I recommend using two different shapes but complementing shapes in terms of theme, size or mood.


1 Acrylic Medium
I love gesso! It is one of the most versatile acrylic mediums around. In this layout I used it in four different ways: As a modeling paste for creating a pattern with a stencil, a paint to add color to the butterflies, an accent on the chipboard letters and an ink to frame the edges of the page.


How many "ingredients" do you use on a layout? Do you tend to overload your pages? Try this recipe, challenge yourself to simplify, to downsize and to utilize your supplies.

Don't miss out! Keep up with all the crafty goodness by subscribing to the Einat Kessler creative newsletter

Have fun creating!

Friday, June 19, 2015

Making a Family History Book Part 5

Welcome to the final part of the series. I can now update you that the heritage book I created won first place! So I guess they liked my ideas for an interesting original design...I hope you do to. I have a few more ideas to share...

Make it Your Own

Sometimes you have an idea but you don't have the right supplies. I wanted to create doors, as an interactive mechanism to present the text in this page. However, I've already used a mechanism like that on another page so I didn't want to repeat myself. I decided to use a paper that looks like a door and not just two paper flaps. The problem was I didn't have the right size of paper. the solution was to scan the pattern into my computer and enlarge it to the size I need. Then I added them to my layout and inserted the text under them.


Layering

One of the best ways to create an interesting page is to layer different paper and embellishments with the same theme. In this page I had to create a page about the immigration routes of the family. So instead of just adding a map and text I layered a travel themed paper as a background and added a sign as the legend.


Quotes

I love using quotes. They're a great way to add more layer of content to the text. It is also a solution when you have a short text or want to keep the page simple without too many embellishments. I used many quotes all throughout the book. You can find quotes on many websites just search the subject you want with the word quote for example: "family quotes".


Get Artistic

Sometimes the best way to add something extra to a text page is to get artistic. By that I mean think outside of the box in term of interpretation of the text and idea of the story. One of the subjects my son had to write about in the book was about "accepting the different". My son chose to write about Autistic people and how they can be integrated in society. So for this page I created a tare in the paper that is combined together with a string, two parts integrated. An abstract expression of an idea. 


That concludes this series...
If by now you have not started your own heritage book or at least created a few family pages I'm sure your fingers are itchy and you are just waiting for the weekend when you'll have more time :)
Please share your pages with me...

I hope you liked this series and if you did please let me know in a comment.

Don't miss out! Keep up with all the crafty goodness by subscribing to the Einat Kessler creative newsletter

Have fun creating!

Friday, June 12, 2015

Making a Family History Book Part 4

Welcome to the fourth post in the series! I hope you you were inspired to start your own family history book or to add some new ideas to the heritage projects you're currently working on.

More Photos space

I've used interactive opening flaps to increase the space for text, but it is also a great solution for more photos space. Create an opening flap with text on both sides and add photos on the part under it. this will also create an element of surprise and discovery to the history book and give the viewer a feeling of exploring and discovering the history themselves.


Interactive mechanisms

I've already explained how interactive mechanisms can increase space for text and photos, but these mechanisms can help you add content to the page. The same way you can use a theme to tell a part of the story you can use an interactive mechanism. In this page I created an opening envelope with a letter inside that is the the story of my grandfather. The envelope is part of the story by conveying the idea of him being away.


Other Forms of Text

The written word is a vast fascinating place that we can draw a lot of inspiration from. One way I presented the text is to arrange it in a form of a newspaper. I thought of a name for the newspaper, which is based on the family name of that side of the family and arranged all the text in columns similar to a news paper. I even gave each little story a headline and added advertisements and photos. Since most of the stories take place more than 60 years ago I found advertisements from that period online and added them for a more authentic look.


Make sure to tune in on Friday for the final part of the "Making a Family History Book" series!

Don't miss out! Keep up with all the crafty goodness by subscribing to the Einat Kessler creative newsletter


Have fun creating! 

Friday, June 5, 2015

Making a Family History book Part 3

Welcome to part 3 of the series Making a Family History Book part 3. I hope you found the ideas I've shared so far inspiring and maybe even try a few of them.

 Gossip & Experiences

At first glance you might think it's inappropriate to include such things in a heritage book, but consider the fact that this book is a history book for generations to come. The experiences or gossip stories of today will be the treasured memories tomorrow. In this page, which is the opening page for the chapter about the immediate family, I added short sentences about special things we like to do together as a family.


Themed pages

Themed pages are pages which are designed according to a specific subject. A page like that is a great and creative way to tell a story about a person. By creating a page about space it is easy to understand that my other son is interested in this subject without using words.


Multiple Scenes

Creating multiple scenes as an embellishment for a page is another way to create a themed page, only a little more complex. The next page is made up of three pages designed as a book. On the left side of the page there is a scene of a little house among the trees. This scene is glued to the background paper and stay constant.


The right side of the scene is on the left side of the text page which opens up to reveal more pages. When you open the pages the scene changes! The first scene is a horse and carriage in the woods. The second page shows a group of tents in the woods and the third page shows two little girls with school bags on their backs.


The first two scenes were created by paper piecing and the last scene is an image I cut from a photo.

Use the Story

All scenes presented in this page were taken from the story in the text itself. You can find inspiration in any story and use elements from it to create embellishments on the page.

Tune in next Friday for the fourth post of the series!

Don't miss out! Keep up with all the crafty goodness by subscribing to the Einat Kessler creative newsletter

Have fun creating!

Friday, May 22, 2015

Making a Family History Book Part 2

Welcome to part 2 of making a Family History Book! I have some more tips for an old school traditional heritage scrapbook to share!

Use Office Supplies

Last time we stopped at the middle of the first chapter that was about the first link in the chain...my son. The next page is avout the school years and would be great as a design for Back to School page. I used an old fashion notebook for the text. I removed all the pages and inserted the printed cardstock that I cut to size.

The page when the notebook is closed

Note book opened

More Text Less Space

A great way to insert long texts to a limited space is to create interactive mechanism. A small notebook or booklet that measures 4"x6" will only take that space although it can include a lot of text. Print the text on flaps or fold A4 pages in half. This way you can use more that one A4 page aslong as you stackthem together.

Parallels and Contrasts

Use parallels and contrast to present the text. Oneof the things my son had to write about is how he sees himself today and how he sees himself in the future. Instead of presentingeach paragraph in a different page I create a "Time Clock". One side with the Today text and the other side with the Future text. I printedthe two texts in half a circle shape and added halg a clock that turns to reveal each side. This idea will be good for young Vs. old photos or story, Now and then, father and son and more.

"me Today" side

"Me in the Future" side

Symbols

The next page is about the Torah Portion. According to Judaism each man has a story in the bible that coordinates with his date of birth. each story is comprised from a few chapters in the bible that are called a portion. In the Bar-Mitzvah ceremony the boy readshis portion in the synagogue.
Historical events or religios events are the perfect opportunity to design apage with symbols. For this page I used a brick wall stencil to create a pattern that resembles the wailing wall (which is the part of the temple's wall that exist to this dayin Jerusalem).
If your grandfather was in the civil war you can use brass buttons, if you have a relative who came to the US when it was established you can add a parchment as a declaration of independence, or stars and banners for apage about a soldier.


Tune in next Friday for some more tips and tricks on how to create more heritage pages with a unique style and embellishments.

Don't miss out! Keep up with all the crafty goodness by subscribing to the Einat Kessler creative newsletter
have fun creating!


Friday, May 15, 2015

Making a Family History Book Part 1

My young son is turning 13 soon. This year it's his bar-Mitzvah year which means he has special events throughout the year not only with the family but at school too. One of the highlights of the year is creating a heritage book. This is a few months process where the kids find out about their roots and ancestors through interviews, photos, stories and memorabilia.

my son started this process in a very reluctant way, not really understanding why does he need to do such an elaborate work. Slowly he was captured by the stories about far away places and events, the old photos and the customs. He even got to the point of telling me: "I don't understand why we have a time limit on this and why we are graded on it. Such an important work should not be done under pressure. I don't care about the grade I'm doing it because it's important!"


15% of the grade is for presentation. Well...you really thought I would live that to him? I took the job to create our family history book. I didn't want to create a digital book, that seemed to plain for me. Everybody would have that. I wanted to make something special. I decided to create a traditional scrapbook! However I ran into a few problems... First there was a lot of text. Our family history is mostly about the stories and less about the photos, because a lot of them were lost in the Second WW. I had to find a way to include all the text and the photos of each family member on one page or I'll end up with more than a 100 pages which will be a ginormous scrapbook. My solution was to Create interactive pages! But then I ran into another problem...the page protectors, they were in the way. One friend suggested to cut the page protectors where the flaps were and another friend suggested to glue the pages on the protectors. I didn't like those ideas, so I decided to go really old school. I used an old fashion scrapbook with plain paper pages (something like a large sketchbook) that I could glue down the finished pages on.

The final result was AMAZING!

There are a lot of tutorials and blog posts online about how to create a heritage book, organize the materials and photos etc. I want to share with you the different style, approach and creative way that I created our heritage scrapbook. The text is all in Hebrew (and I blurred most of it) but the design is universal and can be done in any language.


Uniform Title

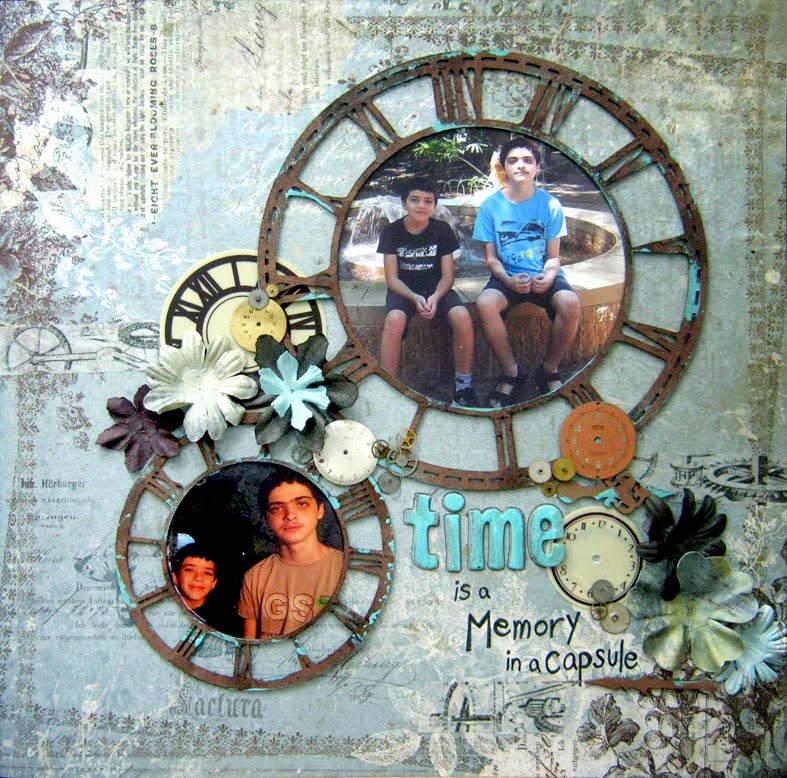
The scrapbook is divided to chapters. Each chapter started with a page in the same design. Hebrew is written from right to left so the chapter's title was on the top left corner. Each title was spelled with letter stickers and was embellished with a photo or an image and a lace ribbon.

I wanted the scrapbook to have a uniform design but not to be boring. All the pages have a vintage shabby chic look that goes well with the theme of heritage and history. I tried to give each page a unique look but still keep it with general theme. I used a lot of layering, travel and maps motifs as well as vintage ephemera. All the text was printed on A4 papers (I don't have a 12x12 printer...another problem I had to solve) that were cut in different sizes.

Photo Cutting & Collage

The first chapter is "I'm a link in the chain" and it is all about the writer of the work...my son, who is one link in the chain that is the family. One of the elements of one's identity is their name. So one page was dedicated to the meaning of the name. Next to the name I added a photo collage that seem to jump out of the page. Cutting the image of the person out of the photo is a very effective technique to use different photos and create a collage.


Echoing

One of the embellishments principles I used in this page was echoing. Echoing means you repeat an element in the design. In this page I echoed the word "chain" and added different kinds of circles as the links in it.

Blocking

An interesting way to present data, especially dates, numbers and such is to create blocks. I created a sort of a birth certificate with all the data about my son when he was a baby. I included the usual birth date, weight, parents' details and occupations, but also other more unusual things like zodiac sign and mood.


It occurred to me the photos are not very good. I;m sorry about that, I remembered to take the photos on 6am of the morning he gave the heritage book to the teacher...and she hasn't returned it yet :)

In the interest of not boring you too much or having a long blog post I'm going to divide this post into a few parts. Make sure to tune in on Friday for part 2!

Don't miss out! Keep up with all the crafty goodness by subscribing to the Einat Kessler creative newsletter

Have fun creating!


Saturday, April 25, 2015

NEW!! 3, 2, 1 Craft Recipe!

New Saturday MIXTRAVAGANZA series: 3, 2, 1 CRAFT RECIPE!!

We all want to maximize the supplies we have but sometimes we are lost as to how to do it. I'm here to help you with a new but familiar way: a recipe! When you want to use your kitchen supplies or create something yummy you look for an easy recipe right? Well...this is the same! An easy recipe to create a project with your supplies. Each craft recipe will have the 3, 2, 1 system so it'll be easy to remember and follow!
This recipe is:
3 Chipboard covering techniques
2 Colors
1 photo layout
How fun is that??

let's get cooking!!


Unlike some of my projects this is a rather minimalist project. Not too many layers or embellishments on the page. Sometimes we want to get ahead with scrapping our photos and we don't have a lot of time to invest in a complicated layout. So this one is fast!


3 Chipboard Techniques
I used three different techniques to cover a chipboard: painting with gesso, inking and embossing, three well known and used techniques. Here are a few tips:
* Painting with gesso has multiple effects like giving texture, sealing the chipboard and covering it with a color. If you want the chipboard to remain in the original color use clear gesso.
* When inking chipboard make sure to use pigment ink for a better color and less absorption.
* Emboss with different powder thickness and partial coverage. That will give you great effects and diversity.


2 Colors
This layout is about two brothers which are two opposites, so I used two colors which are striking but neutral at the same time: black and white. They also match the colors in the photo beautifully and give the layout the minimalist look I was going for.


1 Photo
I usually like to use more than one photo because if I'm scrappin' I might as well use as many photos as possible right? However this is such a great photo that says so much i didn't want to cloud it with more photos. Sometimes using only one photo can be intimidating because a lot of the page stays empty. don't be afraid of that this is what we call blank space and it's a good thing! It helps the eye focus on what's important.

Check out the step by step video for all the deets of how to create this recipe!

Don't miss out! Keep up with all the crafty goodness by subscribing to the Einat Kessler creative newsletter

Have fun creating! 

Tuesday, March 24, 2015

How to use unsuccessful photos on a layout

In the digital age we're not afraid to take pictures and photograph things because we can always delete it! But I still have old photos which are not so successful to say the least and it really bother me that I can't do anything with them. When I say unsuccessful I also mean blurry photos but mostly un scrapable photos. Those photos which don't tell any story, which have unwanted people in the background or not so nice facial expressions. The photos where somebody else took for me and I wish I didn't ask because they are too close or too far or not what I wanted...you get the picture.

I challenged myself to use them and come up with a way to create layouts with them. Here is what I came up with...


The first layout is a collage. Many small photos I cut from the original photo. I cut the faces that were lost in the noisy background or were too far to see. I used Blue Fern Studios' Marrakech Panel to create a grid to house the small photos. I sprayed the chipboard with several colors and added a little white gesso and then separated the inner pieces. I arranged the grid, the inner pieces and the pre cut photos on the page and just added a few cut pieces from patterned paper.


You can watch a step by step video tutorial that I created for Blue Fern Studios to check out how I created this layout. Just click here.

For the second layout I used a cut image of my son which I cut out of the photo. I always wanted to use this photo but he always seemed to angry in the photo and I didn't know how to work with that. The idea I had was to use "This is my Life" chipboard by BFS and add something to it. So the title became: "Mom...this is my life!" which fits that angry face.


For the flower garden I used flower chipboards by BFS and colored them with Aquarelle pencils and a water brush. Then I "planted" them in the sprayed cheesecloth I used as grass/flower bed. I also added some paper flowers to have a rich garden fit for spring.

I hope this has inspired you to challenge yourself to use your not so successful photos. Which ones would you use first?

Follow me on Facebook and YouTube for more crafty treats!Have Fun Creating!
Einat

Sunday, February 22, 2015

Masculine layouts: Blue Fern Studios

I'm a big fan of masculine layouts and I have to be because I have two teenage boys who like to look at all the layouts I create with their photos and comment about them. So I always have to balance between design and embellishments, make it interesting but not too feminine.


In these two layouts I did just that. The first layout is pure masculine, not a flower in sight...only gears and cogwheels with masculine colors. All the chipboards were colored and embossed in several layers using different embossing powders. I cut the photos into circles in matching sizes to the chipboard. After adding them to the layout I add some doodling with a white gel pen as well as a title.
Check out the video tutorial on the Blue Fern Studios channel.


The second layout has flowers on it. I like adding flowers to boys' layouts as long as I keep the balance and not add too many. I also try to limit myself to a masculine color scheme and avoid colors like pink.


Do you create masculine layouts?

Have fun creating!
Einat