pages

Thursday, June 28, 2012

Exploring the ocean beach


Summer is here! All the DT girls in Scrapping Everyday Miracles recently played a really fun game. We had a contest between two groups: the first member in each group designed a layout according to a sketch. Then she passed it on to the next one, who didn't see the sketch and had only the layout to follow. It was amazing to see how each one had a different interpretation and how the layouts changed as we progressed. The team that won (mine) was the first to 
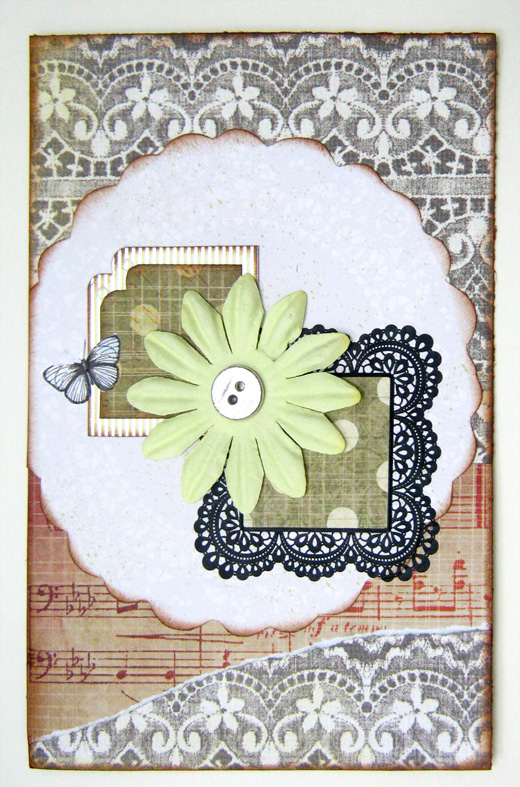
complete all the layouts by its members. Here is my layout for the contest:
I've used the beautiful papers from K & Company Sea Glass that have the most beautiful shades of blue and green. I added all kinds of scraps from my stash including clouds and a surf board. I also created the parasol from pieces of paper and drew flying birds.

Don't forget to enter your project to the SUMMER CONTEST, there's still time to join us and win a great prize, including the beautiful SEA GLASS paper pad I've used in this layout!

Challenges:
Cupcake Inspiration #166
Pile it on #26
Sketchabilities #73
Oldie but A goodie - Summer holidays
Paper play #26
Totally Paper crafts
Crop stop: Are u feeling blue?
DYSU #78
Raise the bar #107
So artful

Have fun creating!

Einat

Wednesday, June 27, 2012

Published on Prima


What a joy to see another one of my layouts on the prima blog. This layout is full of flowers and not just the kind that grows from the ground.
This layout tells the story of two boys that just love to outdoors and watch the flowers bloom. Since I consider them to be my flowers I thought it was appropriate to combine the title with the photos.

I used a fun technique on this layout. The photo seems to be embedded in the background paper because the tear in the paper goes on the photo too. The way to do that is to make a cut in the photo and insert the tearinto the photo. Cool, right?

Have fun creating!

Einat

Tuesday, June 26, 2012

Technique Corner: 4-3-2-1 pattern


Layouts with a pattern create an imaginary path for our eyes to move across the page. That creates flow, order and balance in the layout. One of the most popular and easy patterns is descending number of elements. In this layout it's 4-3-2-1.
4 titles: who says that you have to use only one title per layout? Sometimes adding more than one title helps get the message across in a more fun and colorful way.

3 white circles: I've used the background paper to emphasize both the titles and the theme of the layout by circling the word sweet three times with a white pen.
2 flags: use cut out flags in your layout but instead of hanging them create a pole. I've created my poles from tooth picks (clean tooth picks LOL).

1 flower: if you want to use rhinestone embellishment I recommend to use one, so it won't be too dominant on the layout.

There is still time to join the Summer Contest! Don't forget to enter your project!

Have fun creating!

Einat

Monday, June 25, 2012

Just be you


I recently looked at a few of my projects and realized I hardly ever use the color purple.  Why is that? Since I couldn't find an answer to that question I decided to create something using shades of purple.
I built the easel card on a gray cardstock and added a second layer of patterned paper. For the border I used a Martha Stewart punch and a ribbon. I added a fee handmade spiral flowers, embellishments and a sentiment. I made the stopper a little narrow that usual using the same punch as the border.

Created for:

Pile it on #26 - Make your own embellishments
Quirky Crafts #13 - hand made flowers
Crafty Cardmakers#71 - create your own flowers
Papertake Weekly- Bingo: ribbon, die cuts, buttons
Creative Card crew 1 butterfly, 2 colors (purple and yellow), 3 words.
Divas by Design #40 - to "die" for
Paper Play #25 - use a die
Allsorts #160 - any die will do

Have fun creating!

Einat

Friday, June 22, 2012

Easy Mixed Media

Mixed media is really easy if you use pre-embossed canvas to create resist techniques. All you need to do is cover the canvas with mist, Pan Pastels or distress ink and the pattern pops right up!

Even if the canvas is blank resist technique is easy. Just ink a big stamp with embossing ink and let it dry. Then cover the canvas with any medium you like.

Now all you need to do is create a mini album!

Have fun creating!

Einat

Thursday, June 21, 2012

Ins(paper)ation - Trees


"Keep a green tree in your heart and perhaps a singing bird will come". Chinese Proverb
My inspiration for this page was the paper itself. When I saw it I knew just the right photo to use. A photo I have been saving for a long time for the right paper. I just didn't find the right kind of paper for it until I came across this beautiful wood print.

This is another DT layout for My Punch's Kit of the Month Club. I've added a transparent frame on the photo and created another "frame" from pieces of distressed papers that were placed under the photo. I've added the flags and buttons to insert a little bit of childish atmosphere to the layout.

Don't forget to enter your summer project to the Summer Contest!!

Have fun creating!
Einat

Wednesday, June 20, 2012

101 Flowers Tutorial #16: Duck Tape


Duck Tape? Yes, Duck Tape. In principal you can make a flower of almost any material you want, so why not duck tape? Now it comes in all kinds of colors and patterns  so it's really fun and not expensive to work with and incorporate it in your projects.
Here's how it's done:

1.       Cut a long strip of Duck tape. Fold it almost in half, leaving part of the tape's sticky part exposed.

2.       Start rolling the Duck tape while wrinkling it. If the flower is not big enough you can add another strip and continue rolling and wrinkling.

3.       Add a bead, button or brad as a center.

4.       For a finishing touch add leaves.

Have fun creating!

Einat

Tuesday, June 19, 2012

Summer contest

It's official! Summer is here in two days on June 21st, although it's already summery hot enough for me! To get you all in a summer mood let's have a Summer Contest!
Here is what you need to do:
1. Subscribe to my blog.
2. Post the contest in whatever social media you want: blog, FB, twitter etc. with a link back to the Blog.
3. Enter your summer project. It can be a layout, a card, altered art or any other project you want. It doesn't even have to be new!
The winner will be randomly chosen on July 2nd and will win this great summer prize!

Can't wait to see your projects!
Have fun creating!
Einat

Monday, June 18, 2012

Brothers


A DT layout for Scrapping Everyday Miracles done by the June sketch. This was a really fun sketch with squares background that enabled us to play with the design and use our imagination.
I decided to have 10 squares instead of 9 and create balance on the layout by adding circles. I also added two strings to create movement and a little glimmer mist and stamping to add texture and interest. I usually don’t like to use stereotypic boy colors like blue, but this layout just called for it.  I used papers with different shades of blue and green. To add a splash of color I added yellow, orange and red embellishments.

You can see my design and the other DT's wonderful layouts on the SEM blog. Join in the fun and create a layout with this month's sketch. You have a chance to win a great prize!

Have fun creating!

Einat

Friday, June 15, 2012

Three of a kind


I had some leftovers from My Punch's June kit so I decided to create three cards. They are different but the same.
I've used all the bits and pieces that were left in the kit: a few black rub ons, a piece of a white ribbon a few scraps of paper and some embellishments. Since I used the same paper for background and slightly changed the elements it turned out as a series of cards.

Have fun creating!

Einat

Thursday, June 14, 2012

You are mixed media mini album


I love paper. But sometimes it's fun to play with other materials, like I did in this mini album. It has paper, cardboard, canvas all wrapped into one mini album with some cute and funny photos of my kids.
The first page is made from corrugated cardboard. On the front I made the two colored background with a Vaseline resist technique. The other side is covered with patterned paper and torn to reveal the corrugated cardboard.

The second page is a canvas with a mask background and a really fine cutting of a flower from a patterned paper. The other side is covered with paper with some funny hand writing.

The next page is also canvas. The canvas side is stamped and misted. I also added some hand cut clouds. The other side is covered with paper with a handmade sun as a focal point.

The last page has a mask and stamping on the canvas side and patterned paper on the other.

Butterflies for Creative Inspirations
Boys for The Crafty Pad
Masculine for The pink Elephant
Color thorowdown
Resist technique for Just us Girls

Have fun creating!
Einat

Wednesday, June 13, 2012

Photography Tips: Standing in the presence of history

Taking pictures of faces up close is good. You can see the person's feelings and thoughts and the photo almost pops off the page. But sometimes you want or need to take a few steps back and take the picture from a distance. This is a DT layout for My Punch's Kit of the Month Club that had just the right stuff for my layout.

Usually a photo from a distance is necessary when you want to capture the view or something in the background. In this layout I wanted the entire map to fit in the photo.
So, don't be afraid to take pictures that capture more than just the person. You can always take two photos: one from up close and one from a distance. A combination of the two will make a great layout!

Have fun creating!

Einat

Tuesday, June 12, 2012

One Sheet of Paper Tutorial: Mini Album


You know I love creating project from only one sheet of paper! Here is another fun and easy tutorial for The Robin's Nest DT. This is a great way to create a project without using too many materials or money. All you need is: one sheet of cardstock, two ribbons and a few embellishments! You can visit The Robin's Nest blog and website

1.       Fold a double sided cardstock in four. Open all folds.

2.       Start working on the upper right square. Cut the cardstock on the vertical fold line from the edge to the center. Widen the cut a little bit.

3.       Cut the cardstock on the horizontal fold line half way from the center towards the right.

4.       Fold the upper right square in half to the right.

5.       Cut the cardstock on the new fold line from the center half way to the top.

6.       Fold upward.

7.       Fold again to the right.

8.       Fold downward on the center fold line.

9.       Continue working on the upper left square. Cut the cardstock on the center fold line from the center half way towards the left. Fold to the left.

10.   Fold downward on the center fold line.

11.   Close the two sides of the mini album.

12.   Embellish the cover:

·         Adhere a ribbon around the mini album when closed.
·         Add a tag and another ribbon.
·         Cut flags from scraps of paper and adhere.
·         Add flower and buttons.

13.   Embellish the inside of the mini album but remember to leave room for photos.

Have fun creating!

Einat