pages

Monday, March 28, 2011

Flowery layout…for boys!

I often hear that designing layout for boys is less fun, because you can't use flowers. "It's too girly" is the popular sentence I hear in most cases. Well, I want to say WRONG! It's not true! You can and should use as many flowers as you want on boys and men layouts. Here is one example for such a layout that I did as a DT layout for My Punch.


Just so you will not think it is a onetime deal, here are some more examples:
Mom I'm bored
Holiday White
Don't be scared! Try making a flowery layout for your guy/s.

Just before we part I have an exciting announcement! On April, both I and my blog celebrate our birthday, so in honor of these important occasions I will have a mega giveaway, full of goodies and surprises!! Want to know more? Tune in on Friday.

Einat

Friday, March 25, 2011

1 sheet of paper tutorial: "Cute" flap mini album

Hello my friends! I got so many amazing responses on the first 1 sheet of paper tutorial; I decided to make it a monthly tutorial! That means each month I will teach you to make a different project using only one sheet of paper. I did this mini album as a DT project for My Punch kit of the month club. I only took pictures of the finished album, so for the tutorial I used plain white paper just to show the process.

For the "Cute" mini album you will need:

1 sheet of double sided cardstock
Bind It All

1. Cut four 4" by 8" rectangles. You can fit 4 rectangles on one page if you cut three of them horizontally and one vertically.


2. Cut one rectangle in half, so you will have two 4" by 4" squares.


3. Make two fold lines on one rectangle: the first on the 2" line and the second on the 6" line. Fold a valley fold to create two flaps.


4. Repeat on the other two rectangles.

5. Adhere the first folded rectangle to the second, back to back, applying adhesive only on the 4" back and not on the flaps.


6. Adhere the third rectangle to the flap of the second rectangle, applying adhesive only on the flap.


7. Add the covers on the front and back and bind.

Here is my completed flap mini album.


Don't you think making projects from only one sheet of paper are super fun?

Einat

Monday, March 21, 2011

Treasure box – a different kind of a printers' tray

Printers' trays are in fashion today, everyone has one, made one or got one as a present. I wanted one too, an open treasure box with the photos of thoe I love. But instead of buying a printer's tray from 7 Gypsies or Tim Holtz I decided to use an old wooden tea bag box I had. I painted it with acrylic paint and after it was dry I could add my photos and embellishments.


I wanted to make it as low cost as possible so I added handmade embellishments like the flowers, punched border and flags I created from paper and wire. I also added a few embellishments I found at the Dollar store.


After it was finished I decided that it turned out so nice I should make a few more and give them as Passover presents to my family. A beautiful personal treasure box.


Try to use items you have in your house to create beautiful projects or presents that don't cost much!

Einat

Friday, March 18, 2011

Scrap party – celebrating PURIM

Hello everyone! It's party time! Yesterday we had a great scrap party celebrating the Jewish holiday of Purim. This party had it all! Meeting old and new friends, shopping, make and takes, challenges, presents and really cool costumes.


For those of you who don't know what Purim is, here s the short version: The story of Purim is told in the Biblical book of Esther. The heroes of the story are Esther, a beautiful young Jewish woman living in Persia, and her cousin Mordecai. Esther was taken to the house of Ahasuerus, King of Persia, to become part of his harem. King Ahasuerus loved Esther more than his other women and made Esther queen, but the king did not know that Esther was a Jew, because Mordecai told her not to reveal her identity. The villain of the story is Haman, who hated Mordecai because Mordecai refused to bow down to him, so Haman plotted to destroy the Jewish people. The king gave the fate of the Jewish people to Haman, to do as he pleased to them. Mordecai persuaded Esther to speak to the king on behalf of the Jewish people. She told the king of Haman's plot against her people. The Jewish people were saved, and Haman and his ten sons were hanged on the gallows that had been prepared for Mordecai.


Purim is celebrated in March. The word "Purim" means "lots" and refers to the lottery that Haman used to choose the date for the Jews' massacre. It is customary to wear costumes and hold carnival-like celebrations. We are commanded to read the book of Esther as well as eat, drink and be merry. In addition, we are commanded to send out gifts of food or drink, and to make gifts to charity.

I'm teaching a really cool single page mini album make and take.


We had a great challenge where we had to use a canvas in a design.


This was a great party!!! Happy holiday to everyone!

Einat

Monday, March 14, 2011

Wedding layout – Designer Craft Connection

It's wedding day at the Designer Craft Connection! Welcome to all of you hoppers. Today's blog hop is all about weddings. Each designer is showing a creation related to wedding and there are some beautiful projects and ideas for you. As a paper and scrapbook designer I decided to share with you a layout I did for my wedding album. I have been married for 15 years but until now I didn't have a wedding album. I know..it's a shame! This layout was done as a DT project for My Punch and I was asked to use only a few materials to show a wedding layout that will not be too expensive. For this layout I used only one sheet of patterned paper, three paper flowers and 12 inches of lace ribbon. All the other embellishments were handmade from paper scraps!


Swirls: I cut the swirls from paper, stamped them and add a line around the edges with a black pen.
Frame: The frame is a square piece of paper I inked and distressed a little.
Flowers: The small flowers were made with two different punches and the heart was cut from a piece of paper.
White flower: The big white flower was made from six pieces of white paper I cut in a leaf shape and glued together.
The stickers are all scraps I had from different sticker sheets.


With a little imagination and creativity you can create beautiful wedding layouts that would look great and would not cost much!


To keep on hopping through the entire blog hop just click on the Designer Crafts Blog Connection on the right and click forward to go to the next designer.


Einat

Friday, March 11, 2011

Technique Corner – Creative Title

This layout is a collage of my boys. There are a few photos of each of my boys, from when they were babies up to (almost) now. I wanted to give this layout a feeling of time passing by, so I used a paper from the TIME collection that I designed. The paper has the word time on it and a pattern of clocks. I stamped a few cog wheels and added word accents with time phrases on them.


I wanted the title to reflect the theme of the layout so I used a technique called themed title. This idea of this technique is to create a title that will not just be a word related to the subject of the layout, but the design of the title itself would be created with materials, images and embellishments related to the overall theme. Since the theme of my layout was time, I spelled the word flies from clock parts just below the word time.


Here is how you can do it:

1. Build the letters F, L, I, S from clock hands and attach them to the paper with brads. I used Maya Road Sheers – Clocks accents.

2. Cut a small triangular piece from one medium size clock to form the letter E.

3. Use a metal cog wheel to create the dot above the I. you can find really cool and cheap metal cog wheels at your local hardware store.

Try to add creative titles to your layouts!

Einat

Monday, March 7, 2011

Decorative tote - International Women's Day

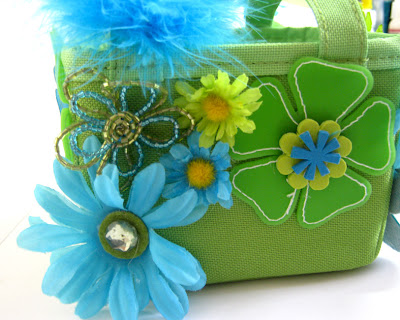
In honor of the International Women's Day celebrated tomorrow, March 8th I decided to treat myself to a present. I had a small tote full of tools and other stuff; it looked green, boring and kind of sad standing on my desk, So, I gave it a makeover! I took all kinds of flowers I had and glued them to the tote with a hot glue gun, added my name and it was done! Now it's really fun using it and every time I look at it I smile. You might say I'm crazy but every now and then from the corner of my eye it seems like the tote is smiling too…


A few facts on International Women's Day:

International Women's Day has been observed since in the early 1900's. Great unrest and critical debate was occurring amongst women. Women's oppression and inequality was spurring women to become more vocal and active in campaigning for change. Then in 1908, 15,000 women marched through New York City demanding shorter hours, better pay and voting rights.
Following the decision agreed at Copenhagen in 1911, International Women's Day (IWD) was honored the first time in Austria, Denmark, Germany and Switzerland on 19 March. More than one million women and men attended IWD rallies campaigning for women's rights to work, vote, be trained, to hold public office and end discrimination. On the eve of World War I campaigning for peace, Russian women observed their first International Women's Day on the last Sunday in February 1913.


In 1913 following discussions, International Women's Day was transferred to 8 March and this day has remained the global date for International Women's Day ever since. Since its birth international Women's Day has grown to become a global day of recognition and celebration across developed and developing countries alike. For decades, IWD has grown from strength to strength annually.


So make a difference, think globally and act locally!! Make everyday International Women's Day!

Treat yourself to a fun, great present!

Einat

Friday, March 4, 2011

Ins(Paper)ation – Creation Journal Project

The process of inspiration is very mysterious to me. Whenever I try to discover where I get my inspiration I find out it never comes from one place and it always a collection of circumstances, images and experiences. Take the next project for example.


I wanted for some time to create a Creation Journal for myself, a journal to write all my creative and thoughts and ideas. The only problem was I never got the inspiration to create it or the idea of how I wanted it to look. Then a chain of events started:
first, I took this photo of a Wagtail (I love this bird),


Then I got the chance to work with the Noteworthy Trees fabulous paper by Magenta and the new cork self adhesive Birds & Branches stickers. Suddenly it was there, an idea for my Creation Journal!


I first covered an old notebook with the patterned paper. Then I added texture and embellishments. I started with applying white shimmer on the paper and then stamped on it. I added a cork bird sticker and gold leafs. On the bottom of the cover I created grass by adhering crumpled green paper with a little more shimmer. I added cork flowers and dew drops.


“Just don't give up on trying to do what you really want to do. Where there is love and inspiration, I don't think you can go wrong.” Ella Fitzgerald

Be inspired!

Einat

Thursday, March 3, 2011

Designer Crafts blog connection

Hello friends! Today is the official launch of the new and exciting designer blog. This amazing group of designers will share with you great projects, new materials, different mediums and all the new trends and innovations from the craft world.


To celebrate this wonderful blog we have an exciting giveaway! That giveaway is Cricut Expressions!!! Entering is simple, 9 blogs have the Cricut logo somewhere on their blog. All you need to do is post the names of the 9 blogs as a comment on Julie McGuffe's blog and you will be entered to win! The name of the winner will be announced on March 13th, which will also be our next hop date! In order to hop from blog to blog, just use the blue craft connection button on the right to move forward or backwards.

This first blog hop is all about CHA, our experiences and impression from the show. I have already shared my CHA adventure with you in previous posts:
CHA – Day 1
CHA - Day 2
CHA - Day 3
CHA - Day 4
I hope you enjoyed hopping and hunting for the treasure. Don't forget our next blog hop is on March 13th.
Einat